AWT GUI Applications
Ex: AWTCounter
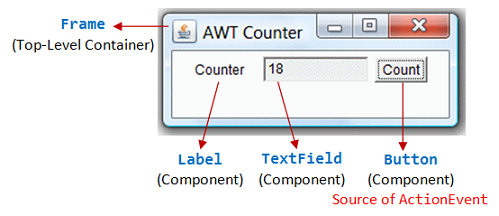
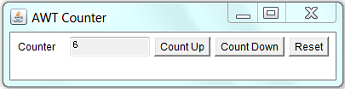
Write an AWT GUI application (called AWTCounter) as shown in the Figure. Each time the "Count" button is clicked, the counter value shall increase by 1.
The program has three components:
- a
java.awt.Label"Counter"; - a non-editable
java.awt.TextFieldto display the counter value; and - a
java.awt.Button"Count".
The components are placed inside the top-level AWT container java.awt.Frame, arranged in FlowLayout.
1 2 3 4 5 6 7 8 9 10 11 12 13 14 15 16 17 18 19 20 21 22 23 24 25 26 27 28 29 30 31 32 33 34 35 36 37 38 39 40 41 42 43 44 45 46 47 48 49 50 51 52 53 54 55 56 57 58 59 60 61 62 63 64 65 66 |
import java.awt.*; // Using AWT container and component classes import java.awt.event.*; // Using AWT event classes and listener interfaces // An AWT program inherits from the top-level container java.awt.Frame public class AWTCounter extends Frame { private Label lblCount; // Declare a Label component private TextField tfCount; // Declare a TextField component private Button btnCount; // Declare a Button component private int count = 0; // Counter's value // Constructor to setup GUI components and event handlers public AWTCounter () { setLayout(new FlowLayout()); // "super" Frame, which is a Container, sets its layout to FlowLayout to arrange // the components from left-to-right, and flow to next row from top-to-bottom. lblCount = new Label("Counter"); // construct the Label component add(lblCount); // "super" Frame container adds Label component tfCount = new TextField(count + "", 10); // construct the TextField component with initial text tfCount.setEditable(false); // set to read-only add(tfCount); // "super" Frame container adds TextField component btnCount = new Button("Count"); // construct the Button component add(btnCount); // "super" Frame container adds Button component BtnCountListener listener = new BtnCountListener(); btnCount.addActionListener(listener); // "btnCount" is the source object that fires an ActionEvent when clicked. // The source object adds an instance of BtnCountListener as an ActionEvent listener, // which provides an ActionEvent handler called actionPerformed(). // Clicking "Count" button calls back actionPerformed(). setTitle("AWT Counter"); // "super" Frame sets its title setSize(300, 100); // "super" Frame sets its initial window size // For inspecting the Container/Components objects // System.out.println(this); // System.out.println(lblCount); // System.out.println(tfCount); // System.out.println(btnCount); setVisible(true); // "super" Frame shows // System.out.println(this); // System.out.println(lblCount); // System.out.println(tfCount); // System.out.println(btnCount); } // The entry main() method public static void main(String[] args) { // Invoke the constructor to setup the GUI, by allocating an instance AWTCounter app = new AWTCounter(); // or simply "new AWTCounter();" for an anonymous instance } // Define an inner class to handle the "Count" button-click private class BtnCountListener implements ActionListener { // ActionEvent handler - Called back upon button-click. @Override public void actionPerformed(ActionEvent evt) { ++count; // Increase the counter value // Display the counter value on the TextField tfCount tfCount.setText(count + ""); // Convert int to String } } } |
You have to use control-c, or "close" the CMD shell, or hit the "terminate" button on Eclipse's Console to terminate the program. This is because the program does not process the WindowEvent fired by the "window-close" button.
TRY:
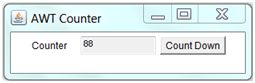
- Modify the program (called
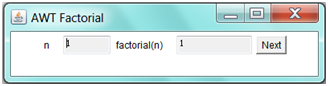
AWTCounterDown) to count down, with an initial value of 88, as shown. - Modify the program (called
AWTFactorial) to display n and factorial of n, as shown. Clicking the "Next" button shall increase n by 1. n shall begin at 1.
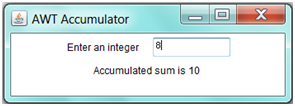
Ex: AWTAccumulator
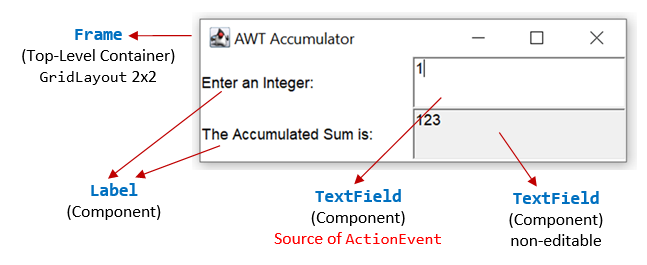
Write an AWT GUI application called AWTAccumulator, which has four components:
- a
java.awt.Label"Enter an integer and press enter"; - an input
java.awt.TextField; - a
java.awt.Label"The accumulated sum is", and - a protected (read-only)
java.awt.TextFieldfor displaying the accumulated sum.
The four GUI components are placed inside a container java.awt.Frame, arranged in GridLayout of 2 rows 2 columns. The program shall accumulate the numbers entered into the input TextField, and display the accumulated sum on the display TextField.
1 2 3 4 5 6 7 8 9 10 11 12 13 14 15 16 17 18 19 20 21 22 23 24 25 26 27 28 29 30 31 32 33 34 35 36 37 38 39 40 41 42 43 44 45 46 47 48 49 50 51 52 53 54 55 56 57 58 59 60 |
import java.awt.*; // Using AWT container and component classes import java.awt.event.*; // Using AWT event classes and listener interfaces // An AWT GUI program inherits (customized) from the top-level container // java.awt.Frame public class AWTAccumulator extends Frame { //private Label lblInput; // Declare input Label (to use anonymous) //private Label lblOutput; // Declare output Label (to use anonymous) private TextField tfInput; // Declare input TextField private TextField tfOutput; // Declare output TextField private int sum = 0; // Accumulated sum, init to 0 // Constructor to setup the GUI components and event handlers public AWTAccumulator() { setLayout(new GridLayout(2, 2)); // "super" Frame (Container) sets layout to GridLayout of 2 rows 2 columns. add(new Label("Enter an Integer: ")); // "super" Frame adds an anonymous Label tfInput = new TextField(10); // Construct TextField add(tfInput); // "super" Frame adds TextField tfInput.addActionListener(new TFInputListener()); // "tfInput" is the source object that fires an ActionEvent upon entered. // The source add an anonymous instance of TFInputListener as an ActionEvent // listener, which provides an ActionEvent handler called actionPerformed(). // Hitting "enter" on tfInput invokes actionPerformed(). add(new Label("The Accumulated Sum is: ")); // "super" Frame adds an anonymous Label tfOutput = new TextField(10); // allocate TextField tfOutput.setEditable(false); // read-only add(tfOutput); // "super" Frame adds TextField setTitle("AWT Accumulator"); // "super" Frame sets title setSize(350, 120); // "super" Frame sets initial window size setVisible(true); // "super" Frame shows } // The entry main() method public static void main(String[] args) { // Invoke the constructor to setup the GUI, by allocating an anonymous instance new AWTAccumulator(); } // Define an inner class to handle the input TextField. // An ActionEvent listener must implement ActionListener interface. private class TFInputListener implements ActionListener { // ActionEvent handler - Called back upon hitting "enter" key on TextField @Override public void actionPerformed(ActionEvent evt) { // Get the String entered into the TextField tfInput, convert to int int numberIn = Integer.parseInt(tfInput.getText()); sum += numberIn; // Accumulate numbers entered into sum tfInput.setText(""); // Clear input TextField tfOutput.setText(sum + ""); // Display sum on the output TextField // convert int to String } } } |
TRY:
- Modify the program (called
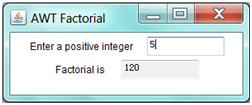
AWTAccumulatorLabel) to display the sum using aLabelinstead of a protectedTextField, as shown (usingFlowLayout). - Modify the program (called
AWTFactorialTextField) to display the factorial of the input number, as shown (usingFlowLayout).
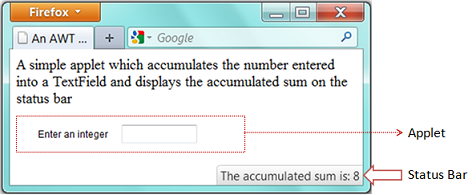
Ex: AWTAccumulatorApplet (Obsolete)
NOTE: Most browsers today do not support Java applets anymore. Keep this section for nostalgia.
An Java applet is a graphics program run inside a browser. Write a Java applet (called AWTAccumulatorApplet) which contains:
- a
label"Enter an integer:", - a
TextFieldfor user to enter a number. - The applet shall accumulate all the integers entered and show it on the status bar of the browser's window.
1 2 3 4 5 6 7 8 9 10 11 12 13 14 15 16 17 18 19 20 21 22 23 24 25 26 27 28 29 |
import java.applet.Applet; import java.awt.*; // Using AWT's containers and components import java.awt.event.*; // Using AWT's event classes and listener interfaces // An applet extends java.applet.Applet public class AWTAccumulatorApplet extends Applet implements ActionListener { private TextField tfInput; // The input TextField private int sum = 0; // The accumulated sum, init to 0 // init() runs when the applet is loaded. Setup the UI components and event handlers. public void init() { add(new Label("Enter an integer")); // anonymous Label tfInput = new TextField(10); add(tfInput); tfInput.addActionListener(this); // Hitting enter key on tfInput invokes actionPerformed() } // ActionEvent handler - Called back when enter key was hit on TextField. public void actionPerformed( ActionEvent evt) { int numberIn = Integer.parseInt(evt.getActionCommand()); // getActionCommand() returns the String entered. sum += numberIn; tfInput.setText(""); // Clear input TextField showStatus("The accumulated sum is: " + sum); // show the sum on the status bar of the browser's window } } |
Note that:
- An applet extends from
java.applet.Applet, whereas a standalone GUI application extends fromjava.awt.Frame. You cannotsetTitle()andsetSize()on Applet. - Applet uses
init()to create the GUI, while standalone GUI application uses the constructor (invoked inmain()).
HTML codes: AWTAccumulatorApplet.html
Applet runs inside a web browser. A separate HTML script (says AWTAccumulatorApplet.html) is required, which uses an <applet> tag to embed the applet as follows:
1 2 3 4 5 6 7 8 9 10 11 |
<html>
<head>
  <title>An AWT Applet</title>
</head>
<body>
  <p>A simple applet which accumulates the number entered into
  a TextField and displays the accumulated sum on the status bar</p>
  <applet code="AWTAccumulatorApplet.class" width="300" height="60">
  </applet>
</body>
</html>
|
TRY:
- Modify the applet to run the "Counter" application (as in
AWTCounter). - Modify the applet to run the "Factorial" application (as in
AWTFactorial).
Event-Handling
Ex: WindowEvent and WindowListener
Modify the AWTCounter program (called AWTCounterWithClose) to process the "Window-Close" button. See the main article.
Inner Class - Named and Anonymous
Similar to AWTCounter, the following programs AWTCounterNamedInnerClass and AWTCounterAnonymousInnerClass use "named inner classes" and "anonymous inner classes", respectively, as the ActionEvent listener.
Ex: Named Inner Class
A named inner class as the event listener: AWTCounterNamedInnerClass.java
1 2 3 4 5 6 7 8 9 10 11 12 13 14 15 16 17 18 19 20 21 22 23 24 25 26 27 28 29 30 31 32 33 34 35 36 37 38 39 40 41 42 43 |
import java.awt.*; // Using AWT's components and containers import java.awt.event.*; // Using AWT's event classes and listener interfaces public class AWTCounterNamedInnerClass extends Frame { private TextField tfCount; private Button btnCount; private int count = 0; // Constructor to setup the UI components and event handlers public AWTCounterNamedInnerClass () { setLayout(new FlowLayout()); // "super" Frame sets to FlowLayout add(new Label("Counter")); // anonymous Label tfCount = new TextField(count + "", 10); tfCount.setEditable(false); // read-only add(tfCount); // "super" Frame adds tfCount btnCount = new Button("Count"); add(btnCount); // "super" Frame adds btnCount // Construct an anonymous instance of inner class BtnListener as // listener to the source btnCount. btnCount.addActionListener(new BtnListener()); setSize(250, 100); setTitle("AWT Counter"); setVisible(true); // show it } public static void main(String[] args) { new AWTCounterNamedInnerClass(); } // A named inner class to be used as listener of ActionEvent // This inner class can access private variables of the outer class, such as count and tfCount. private class BtnListener implements ActionListener { @Override public void actionPerformed(ActionEvent evt) { ++count; tfCount.setText(count + ""); } } } |
Explanation
- An inner class called
BtnListeneris defined, to be used as listener for theActionEventfired by theButtonbtnCount. SinceBtnListeneris anActionEventlistener, it has to implementActionListenerinterface and provide implementation to theactionPerformed()method declared in the interface. - Although instance variables
tfCount,countareprivate, the inner classBtnListenerhas access to them. This is the sole reason why an inner class is used instead of an ordinary outer class. - An anonymous instance of
BtnListeneris constructed via statement "new BtnListener()". TheButtonbtnCountregisters this anonymous instance as a listener to itsActionEventviabtnCount.addActionListener(new BtnListener()).
Ex: Anonymous Inner Class
An anonymous Inner class as the event listener: AWTCounterAnonymousInnerClass.java
1 2 3 4 5 6 7 8 9 10 11 12 13 14 15 16 17 18 19 20 21 22 23 24 25 26 27 28 29 30 31 32 33 34 35 36 37 38 39 |
import java.awt.*; // Using AWT's components and containers import java.awt.event.*; // Using AWT's event classes and listener interfaces public class AWTCounterAnonymousInnerClass extends Frame { private TextField tfCount; private Button btnCount; private int count = 0; // Constructor to setup the UI components and event handlers public AWTCounterAnonymousInnerClass () { setLayout(new FlowLayout()); // "super" Frame sets to FlowLayout add(new Label("Counter")); // anonymous Label tfCount = new TextField(count + "", 10); tfCount.setEditable(false); // read-only add(tfCount); // "super" Frame adds tfCount Button btnCount = new Button("Count"); add(btnCount); // "super" Frame adds btnCount // Construct an anonymous instance of an anonymous class as // listener to the source btnCount btnCount.addActionListener(new ActionListener() { @Override public void actionPerformed(ActionEvent evt) { ++count; tfCount.setText(count + ""); } }); setSize(250, 100); setTitle("AWT Counter"); setVisible(true); // show it } public static void main(String[] args) { new AWTCounterAnonymousInnerClass(); } } |
Explanation
- An anonymous instance of an anonymous inner class is defined via
new ActionListener() { ... } - The compiler creates an anonymous inner class called
$n(wherenis a running number of inner classes) as follows:class $n implements ActionListener() { .... } new $n()
Notes: Observe the output files produced by the Java compiler. Named inner class is named "OuterClassName$InnerClassName.class" and anonymous inner class is named "OuterClassName$n.class".
TRY:
- Modify all the earlier programs to use an anonymous inner class as the
ActionEventlistener. - Modify
AWTCount(calledAWTCounter3Buttons) to include two additional buttons for counting down and reset the count value. Use (i) "this" class as listener for all the 3 buttons; (ii) use one named inner class as listener for all the 3 buttons; (iii) use an anonymous inner class as listener for each button.
Hints for (i) and (ii):You can use event.getActionCommend()to retrieve the label of the button that has fired the event.@Override public void actionPerformed(ActionEvent evt) { String btnLabel = evt.getActionCommand(); // event.getActionCommand() returns the button's label if (btnLabel.equals("Count Up")) { ...... } else if (btnLabel.equals("Count Down")) { ...... } else { ...... } ...... }
Swing GUI Applications
Ex: Converting from AWT to Swing
Convert all the previous AWT exercises (AWTCounter, AWTAccumulator, AWTFactorial, etc.) to Swing applications (called SwingCounter, SwingAccumulator, SwingFactorial, etc.).
Notes:
- Swing Components are kept in package
javax.swing. They begin with a prefix "J", e.g.,JButton,JLabel,JFrame. - Swing Components are to be added onto the
ContentPaneof the top-level containerJFrame. You can retrieve theContentPanevia methodgetContentPane()from aJFrame.Container cp = getContentPane(); // of JFrame cp.setLayout(......); cp.add(......);
For example, SwingCounter.java:
1 2 3 4 5 6 7 8 9 10 11 12 13 14 15 16 17 18 19 20 21 22 23 24 25 26 27 28 29 30 31 32 33 34 35 36 37 38 39 40 41 42 43 44 45 46 47 48 49 50 51 52 |
import java.awt.*; // Using AWT's layouts import java.awt.event.*; // Using AWT's event classes and listener interfaces import javax.swing.*; // Using Swing components and containers // A Swing application extends javax.swing.JFrame (instead of java.awt.Frame) public class SwingCounter extends JFrame { private JTextField tfCount; // Use Swing's JTextField instead of AWT's TextField private JButton btnCount; // Using Swing's JButton instead of AWT's Button private int count = 0; public SwingCounter() { // Get the content-pane of top-level container JFrame // Components are added onto content pane Container cp = getContentPane(); cp.setLayout(new FlowLayout()); cp.add(new JLabel("Counter")); tfCount = new JTextField(count + "", 10); tfCount.setEditable(false); tfCount.setHorizontalAlignment(JTextField.RIGHT); cp.add(tfCount); btnCount = new JButton("Count"); cp.add(btnCount); btnCount.addActionListener(new ActionListener() { @Override public void actionPerformed(ActionEvent evt) { ++count; tfCount.setText(count + ""); } }); setDefaultCloseOperation(JFrame.EXIT_ON_CLOSE); // Exit program if JFrame's close-window button clicked setSize(300, 100); setTitle("Swing Counter"); setVisible(true); // show it } public static void main(String[] args) { // Recommended to run the GUI construction in // Event Dispatching thread for thread-safe operations SwingUtilities.invokeLater(new Runnable() { @Override public void run() { new SwingCounter(); // Let the constructor does the job } }); } } |
Ex: SWingAdder
Write a Swing application called SwingAdder as shown. The "ADD" button adds the two integers and display the result. The "CLEAR" button shall clear all the text fields.
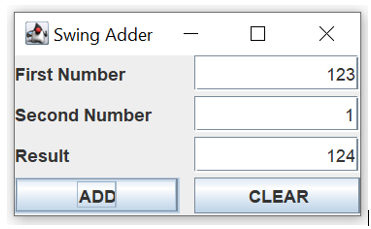
Hints: Set the content-pane to 4x2 GridLayout. The components are added from left-to-right, top-to-bottom.
import java.awt.*;        // Using AWT's layouts
import java.awt.event.*;  // Using AWT's event classes and listener interfaces
import javax.swing.*;     // Using Swing's components and container

// A Swing application extends from javax.swing.JFrame
public class SwingAdder extends JFrame {
   private JTextField tfNumber1, tfNumber2, tfResult;
   private JButton btnAdd, btnClear;
   private int number1, number2, result;

   // Constructor to set up UI components and event handlers
   public SwingAdder() {
      // Swing components should be added to the content-pane of the JFrame.
      Container cp = getContentPane();
      // Set this Container to grid layout of 4 rows and 2 columns
      cp.setLayout(new GridLayout(4, 2, 10, 3));

      // Components are added from left-to-right, top-to-bottom
      cp.add(new JLabel("First Number "));     // at (1, 1)
      tfNumber1 = new JTextField(10);
      tfNumber1.setHorizontalAlignment(JTextField.RIGHT);
      cp.add(tfNumber1);                       // at (1, 2)
      .......
      .......

      btnAdd = new JButton("ADD");
      cp.add(btnAdd);                         // at (4, 1)
      btnAdd.addActionListener(new ActionListener() {
         @Override
         public void actionPerformed(ActionEvent evt) {
            number1 = Integer.parseInt(tfNumber1.getText());
            ......
         }
      });

      btnClear = new JButton("CLEAR");
      cp.add(btnClear);                          // at (4, 2)
      btnClear.addActionListener(new ActionListener() {
         @Override
         public void actionPerformed(ActionEvent evt) {
            ......
         }
      });

      setDefaultCloseOperation(EXIT_ON_CLOSE); // for the "window-close" button
      setTitle("Swing Adder");
      setSize(300, 170);
      setVisible(true);
   }

   // The entry main() method
   public static void main(String[] args) {
      // For thread safety, use the event-dispatching thread to construct UI
      javax.swing.SwingUtilities.invokeLater(new Runnable() {
         @Override
         public void run() {
            new SwingAdder(); // Let the constructor does the job
         }
      });
   }
}
TRY:
- Modify the above exercise (called
SwingArithmetics) to include buttons "+", "-", "*", "/", "%" (remainder) and "CLEAR" as shown.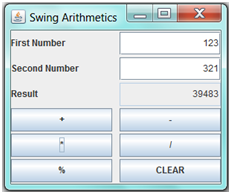
Ex: SwingTemperatureConverter
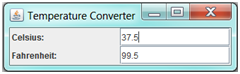
Write a GUI program called SwingTemperatureConverter to convert temperature values between Celsius and Fahrenheit. User can enter either the Celsius or the Fahrenheit value, in floating-point number.
Hints: To display a floating-point number in a specific format (e.g., 1 decimal place), use the static method String.format(), which has the same form as printf(). For example, String.format("%.1f", 1.234) returns String "1.2".
Ex: SwingCurrencyConverter
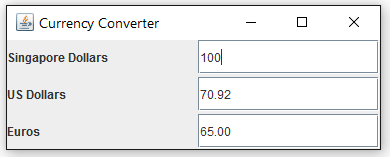
Write a simple currency converter, as shown in the figure. User can enter the amount of "Singapore Dollars", "US Dollars", or "Euros", in floating-point number. The converted values shall be displayed to 2 decimal places. Assume that 1 USD = 1.41 SGD, 1 USD = 0.92 Euro, 1 SGD = 0.65 Euro.
Ex: SwingNumberGuess
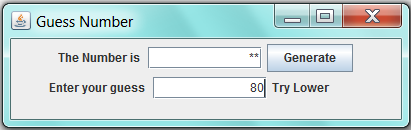
Write a number guessing game in Swing (as shown in the Figure). The program shall generate a random number between 1 to 100. It shall mask out the random number generated and output "Yot Got it", "Try Higher" or "Try Lower" depending on the user’s input.
Hints:
- You can use
Math.random()to generate a random number indoublein the range of[0.0, 1.0).
Ex: SwingPhoneApp
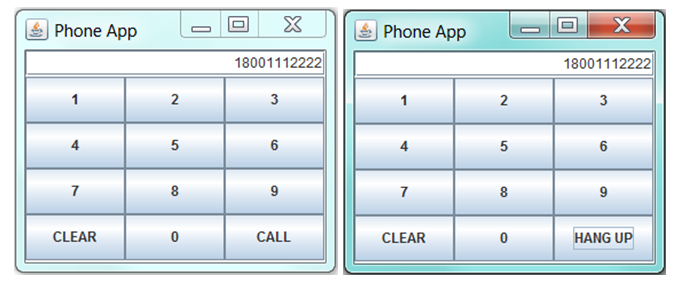
Write a Software Phone App using Java Swing as illustrated in the figure. The user enters the phone number and pushes the "CALL" button to start a phone call. Once the call is started, the label of the "CALL" button changes to "HANG UP". When the user hangs up, the display is cleared.
Assume that the following 2 methods are available for handling phone call:
public void call(String phoneNumber);  // to make a phone call with the phoneNumber
public void hangup();  // to terminate the existing call
Hints:
- Use a 10-element
JButtonarray to hold the 10 numeric buttons. Construct a common instance of a named inner class as theActionListenerfor the 10 numeric buttons. - Use a
booleanflag (saysisCalling) to keep track of the status.
1 2 3 4 5 6 7 8 9 10 11 12 13 14 15 16 17 18 19 20 21 22 23 24 25 26 27 28 29 30 31 32 33 34 35 36 37 38 39 40 41 42 43 44 45 46 47 48 49 50 51 52 53 54 55 56 57 58 59 60 61 62 63 64 65 66 67 68 69 70 71 72 73 74 75 76 77 78 79 80 81 82 83 84 85 86 87 88 89 90 91 92 93 94 95 96 97 98 99 100 101 102 103 104 105 106 107 108 109 |
import java.awt.*; // Using AWT's layouts import java.awt.event.*; // Using AWT's event classes and listener interfaces import javax.swing.*; // Using Swing components and containers // A Swing application extends javax.swing.JFrame public class SwingPhoneApp extends JFrame { private JButton[] btnNumbers; // array private JButton btnCall; private JButton btnClear; private JTextField tfDisplay; private String strPhoneNumber = ""; private boolean isCalling = false; public SwingPhoneApp() { // Get the content-pane of top-level container JFrame // Components are added onto content pane Container cp = getContentPane(); cp.setLayout(new BorderLayout()); // Set up the top display panel JPanel pnlDisplay = new JPanel(new FlowLayout()); cp.add(pnlDisplay, BorderLayout.NORTH); // Set up the display text field tfDisplay = new JTextField(30); tfDisplay.setEditable(false); tfDisplay.setHorizontalAlignment(JTextField.RIGHT); pnlDisplay.add(tfDisplay); // Set up the center button panel JPanel pnlButtons = new JPanel(new GridLayout(4, 3, 3, 3)); cp.add(pnlButtons, BorderLayout.CENTER); // Set up a common listener for all number buttons MyNumberButtonListener lis = new MyNumberButtonListener(); // Allocate the JButton array for number buttons btnNumbers = new JButton[10]; // Allocate each of the item (JButton) of the array for (int i = 0; i < btnNumbers.length; ++i) { btnNumbers[i] = new JButton(i + ""); // Add the common listener to each of the JButton btnNumbers[i].addActionListener(lis); } // Add the JButtons in the right order for (int i = 1; i <= 9; ++i) { pnlButtons.add(btnNumbers[i]); } btnClear = new JButton("CLEAR"); pnlButtons.add(btnClear); btnClear.addActionListener(new ActionListener() { @Override public void actionPerformed(ActionEvent e) { strPhoneNumber = ""; tfDisplay.setText(strPhoneNumber); } }); // JDK 8 Lambda Expression // btnClear.addActionListener(e -> {strPhoneNumber = ""; tfDisplay.setText(strPhoneNumber);}); pnlButtons.add(btnNumbers[0]); btnCall = new JButton("CALL"); pnlButtons.add(btnCall); btnCall.addActionListener(new ActionListener() { @Override public void actionPerformed(ActionEvent e) { if (isCalling) { isCalling = false; btnCall.setText("CALL"); // call(strPhoneNumber) } else { isCalling = true; btnCall.setText("HANG UP"); // hangup() } } }); setDefaultCloseOperation(JFrame.EXIT_ON_CLOSE); // Exit program if JFrame's close-window button clicked setSize(300, 250); setTitle("Swing Counter"); setVisible(true); // show it } // Named inner listener class for the number buttons private class MyNumberButtonListener implements ActionListener { @Override public void actionPerformed(ActionEvent e) { strPhoneNumber += e.getActionCommand(); tfDisplay.setText(strPhoneNumber); } } public static void main(String[] args) { // Recommended to run the GUI construction in // Event Dispatching thread for thread-safe operations SwingUtilities.invokeLater(new Runnable() { @Override public void run() { new SwingPhoneApp(); // Let the constructor does the job } }); } } |
Ex: SwingCalculator

Implement a simple calculator (called SwingCalculator) as shown.
Hints:
- Set the
ContentPanetoBorderLayout. Add aJTextField(tfDisplay) to theNORTH. Add aJPanel(panelButtons) to theCENTER. Set theJPaneltoGridLayoutof 4x4, and add the 16 buttons. - All the number buttons can share the same listener as they can be processed with the same codes. Use
event.getActionCommand()to get the label of the button that fires the event. - The operator buttons "
+", "-", "*", "/", "%" and "=" can share a common listener. - Use an anonymous inner class for "
C" button. - You need to keep track of the previous operator. For example in "1 + 2 =", the current operator is "=", while the previous operator is "+". Perform the operation specified by the previous operator.
import java.awt.*;
import java.awt.event.*;
import javax.swing.*;   // Using Swing's components and containers

// A Swing application extends from javax.swing.JFrame
public class SwingCalculator extends JFrame {
   private JTextField tfDisplay;
   private int result = 0;          // the result so far
   private String numberInStr = ""; // the number entered as String
   private char previousOpr = ' ';  // the previous operator
   private char currentOpr = ' ';   // the current operator

   // Constructor to setup the UI components and event handlers
   public SwingCalculator() {
      // TODO: Setup the UI
      // ......
   }

   // Number buttons listener (inner class)
   class NumberBtnListener implements ActionListener {
      @Override
      public void actionPerformed(ActionEvent evt) {
         numberInStr += evt.getActionCommand();
         tfDisplay.setText(numberInStr);
      }
   }

   // Operator buttons listener (inner class)
   class OprBtnListener implements ActionListener {
      @Override
      public void actionPerformed(ActionEvent evt) {
         previousOpr = currentOpr;  // save
         currentOpr = evt.getActionCommand().charAt(0);
         // TODO: Processing logic
         // ......
      }
   }
}
Ex: SwingLoginPanel
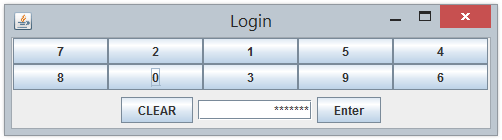
A Java Swing application has a login page as shown in the Figure. Users are required to enter the correct passcode to start the application. The system uses a scramble keypad with a randomly allocated set of numbers from 0 to 9. The display shall show "Enter passcode" initially, and show an asterisk (*) for each number entered. Upon pushing the "Enter" button, the system verifies the passcode. If the passcode is correct, the system invokes a method called startApp() to start the application. Otherwise, it displays "Wrong passcode". The "Clear" button shall clear the display.
Assume that the following methods are available:
public String getPasscode(); // return the passcode
public void startApp();      // Start the application
public void shuffleArray(int[] array)
   // Shuffle (Randomize) the given int array, e.g.,
   // int[] numbers = {1, 2, 3, 4, 5};
   // shuffleArray(numbers); // randomize the elements
Ex: SwingLock
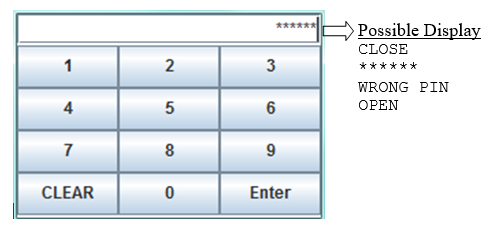
Write a Java Swing application for an electronic lock as shown in the figure. The display shall show the state of either "CLOSE" or "OPEN". In the "CLOSE" state, the user types his PIN followed by the "Enter" key to unlock the system. The display shall show an asterisk (*) for each number entered. The display shall show "WRONG PIN" if the PIN is incorrect. The "Clear" button clears the number entered (if any), locks the system and sets the display to "CLOSE".
Assume that the following methods are available:
public boolean checkPIN(String PIN);  // return true for correct PIN
public void unlock();   // Unlock the system
public void lock();     // Lock the system
Hints:
- Use a 10-element
JButtonarray to hold the 10 numeric buttons. Construct a common instance of a named inner class as theirActionListener. - Use a
booleanflag (saysisLocked) to keep track of the status.
Ex: Using Eclipse/NetBeans GUI Builder
Write the SwingCounter using Eclipse/NetBeans' GUI builder. Read the respective section in "Eclipse How-To" or "NetBeans Hot-To".
Study the code generated by Eclipse/NetBeans.
Custom Graphics
Ex: MoveABall
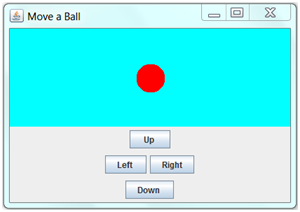
Study the "Move-a-line" program. Modifying the program to move a ball in response to up/down/left/right buttons, as well as the 4 arrow keys, as shown.
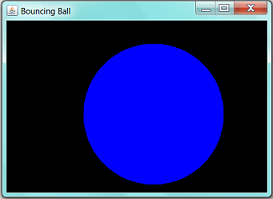
Ex: BouncingBall