GCC (GNU Compiler Collection)
A Brief History and Introduction to GCC
The original GNU C Compiler (GCC) is developed by Richard Stallman, the founder of the GNU Project. Richard Stallman founded the GNU project in 1984 to create a complete Unix-like operating system as free software, to promote freedom and cooperation among computer users and programmers.
GCC, formerly for "GNU C Compiler", has grown over times to support many languages such as C (gcc), C++ (g++), Objective-C, Objective-C++, Java (gcj), Fortran (gfortran), Ada (gnat), Go (gccgo), OpenMP, Cilk Plus, and OpenAcc. It is now referred to as "GNU Compiler Collection". The mother site for GCC is http://gcc.gnu.org/. The current version is GCC 7.3, released on 2018-01-25.
GCC is a key component of so-called "GNU Toolchain", for developing applications and writing operating systems. The GNU Toolchain includes:
- GNU Compiler Collection (GCC): a compiler suite that supports many languages, such as C/C++ and Objective-C/C++.
- GNU Make: an automation tool for compiling and building applications.
- GNU Binutils: a suite of binary utility tools, including linker and assembler.
- GNU Debugger (GDB).
- GNU Autotools: A build system including Autoconf, Autoheader, Automake and Libtool.
- GNU Bison: a parser generator (similar to lex and yacc).
GCC is portable and run in many operating platforms. GCC (and GNU Toolchain) is currently available on all Unixes. They are also ported to Windows (by Cygwin, MinGW and MinGW-W64). GCC is also a cross-compiler, for producing executables on different platform.
GCC Versions
The various GCC versions are:
- GCC version 1 (1987): Initial version that support C.
- GCC version 2 (1992): supports C++.
- GCC version 3 (2001): incorporating ECGS (Experimental GNU Compiler System), with improve optimization.
- GCC version 4 (2005):
- GCC version 5 (2015):
- GCC Version 6 (2016):
- GCC Version 7 (2017):
C++ Standard Support
There are various C++ standards:
- C++98
- C++11 (aka C++0x)
- C++14 (aka C++1y)
- C++17 (aka C++1z)
- C++2a (next planned standard in 2020)
The default mode is C++98 for GCC versions prior to 6.1, and C++14 for GCC 6.1 and above. You can use command-line flag -std to explicitly specify the C++ standard. For example,
-std=c++98, or-std=gnu++98(C++98 with GNU extensions)-std=c++11, or-std=gnu++11(C++11 with GNU extensions)-std=c++14, or-std=gnu++14(C++14 with GNU extensions), default mode for GCC 6.1 and above.-std=c++17, or-std=gnu++17(C++17 with GNU extensions), experimental.-std=c++2a, or-std=gnu++2a(C++2a with GNU extensions), experimental.
Installing GCC on Unixes
GNU Toolchain, including GCC, is included in all Unixes. It is the standard compiler for most Unix-like operating systems.
Installing GCC on Mac OS X
Open a Terminal, and enter "gcc --version". If gcc is not installed, the system will prompt you to install gcc.
$ gcc --version
......
Target: x86_64-apple-darwin14.5.0   // 64-bit target codes
Thread model: posix
Installing GCC on Windows
For Windows, you could either install Cygwin GCC, MinGW GCC or MinGW-W64 GCC. Read "How to install Cygwin and MinGW".
- Cygwin GCC: Cygwin is a Unix-like environment and command-line interface for Microsoft Windows. Cygwin is huge and includes most of the Unix tools and utilities. It also included the commonly-used Bash shell.
- MinGW: MinGW (Minimalist GNU for Windows) is a port of the GNU Compiler Collection (GCC) and GNU Binutils for use in Windows. It also included MSYS (Minimal System), which is basically a Bourne shell (
bash). - MinGW-W64: a fork of MinGW that supports both 32-bit and 64-bit windows.
Various GCCs under Cygwin
There are many GCCs under Cygain/MinGW. To differentiate these variations, you need to understand the followings:
- Windows/Intel uses these instruction sets: x86 is a 32-bit instruction set; i868 is a 32-bit enhanced version of x86; x86_64 (or amd64) is a 64-bit instruction set.
- 32-bit compilers/programs can run on 32-bit or 64-bit (backward compatible) Windows, but 64-bit compiler can only run on 64-bit Windows.
- 64-bit compilers may produce target of 32-bit or 64-bit.
- If you use Cygwin's GCC, the target could be native Windows or Cygwin. If the target is native Windows, the code can be distributed and run under Windows. However, if the target is Cygwin, to distribute, you need to distribute Cygwin runtime environment (
cygwin1.dll). This is because Cygwin is a Unix emulator under Windows.
MinGW-W64 Target 32/64-bit Native Windows
The MinGW-W64 (a fork of MinGW, available at http://mingw-w64.org/doku.php) supports target of both 32-bit and 64-bit native Windows. You can install "MinGW-W64" under "Cygwin" by selecting these packages (under "devel" category):
mingw64-x86_64-gcc-core: 64-bit C compiler for target of native 64-bit Windows. The executable is "x86_64-w64-mingw32-gcc".mingw64-x86_64-gcc-g++: 64-bit C++ compiler for target of native 64-bit Windows. The executable is "x86_64-w64-mingw32-g++".mingw64-i686-gcc-core: 64-bit C compiler for target of native 32-bit Windows. The executable is "i686-w64-mingw32-gcc".mingw64-i686-gcc-g++: 64-bit C++ compiler for target of native 32-bit Windows. The executable is "i686-w64-mingw32-g++".
Notes:
- I suggest you install "
mingw64-x86_64-gcc-core" and "mingw64-x86_64-gcc-g++" to provide native 64-bit Windows codes, but skip "mingw64-i686-gcc-core" and "mingw64-i686-gcc-g++", unless you need to produce 32-bit Windows applications. - For JNI (Java Native Interface) in 64-bit Java, you need to use "
x86_64-w64-mingw32-gcc" or "x86_64-w64-mingw32-g++" to produce 64-bit native Windows code.
Run the executables and check the versions:
// Target 64-bit native Windows
$ x86_64-w64-mingw32-gcc --version
x86_64-w64-mingw32-gcc (GCC) 6.4.0

$ x86_64-w64-mingw32-gcc -v
Using built-in specs.
COLLECT_GCC=x86_64-w64-mingw32-gcc
COLLECT_LTO_WRAPPER=/usr/lib/gcc/x86_64-w64-mingw32/6.4.0/lto-wrapper.exe
Target: x86_64-w64-mingw32
Configured with: .....
Thread model: posix
gcc version 6.4.0 (GCC)

$ x86_64-w64-mingw32-g++ --version
x86_64-w64-mingw32-g++ (GCC) 6.4.0

// Target 32-bit native Windows
$ i686-w64-mingw32-gcc --version
i686-w64-mingw32-gcc (GCC) 6.4.0

$ i686-w64-mingw32-g++ --version
i686-w64-mingw32-g++ (GCC) 6.4.0
Other GCCs in Cygwin
Other GCC packages in Cygwin are:
gcc-core, gcc-g++: Basic 64-bit C/C++ compiler target 64-bit Cygwin. You probably should install these two packages too. However, to distribute the code produced, you need to distribute Cygwin Runtime Environment (cygwin1.dll). This is because Cygwin is a Unix emulator under Windows.cygwin32-gcc-core, cygwin32-gcc-g++: Older 32-bit C/C++ compiler for target 32-bit Cygwin (Obsoleted bygcc-codeandgcc-g++?).mingw-gcc-core, mingw-gcc-g++: Older MinGW 32-bit C/C++ compiler for 32-bit Windows (Obsoleted by MinGW-W64 packages?).
Post Installation
Versions
You could display the version of GCC via --version option:
$ gcc --version
gcc (GCC) 6.4.0

$ g++ --version
g++ (GCC) 6.4.0
More details can be obtained via -v option, for example,
$ gcc -v
Using built-in specs.
COLLECT_GCC=gcc
COLLECT_LTO_WRAPPER=/usr/lib/gcc/x86_64-pc-cygwin/6.4.0/lto-wrapper.exe
Target: x86_64-pc-cygwin
Configured with: ......
Thread model: posix
gcc version 6.4.0 (GCC)

$ g++ -v
Using built-in specs.
COLLECT_GCC=g++
COLLECT_LTO_WRAPPER=/usr/lib/gcc/x86_64-pc-cygwin/6.4.0/lto-wrapper.exe
Target: x86_64-pc-cygwin
Configured with: ......
Thread model: posix
gcc version 6.4.0 (GCC)
Help
You can get the help manual via the --help option. For example,
$ gcc --help
Man Pages
You can read the GCC manual pages (or man pages) via the man utility:
$ man gcc
// or
$ man g++
// Press space key for next page, or 'q' to quit.
Reading man pages under CMD or Bash shell can be difficult. You could generate a text file via:
$ man gcc | col -b > gcc.txt
The col utility is needed to strip the backspace. (For Cygwin, it is available in "Utils", "util-linux" package.)
Alternatively, you could look for an online man pages, e.g., http://linux.die.net/man/1/gcc.
The GCC man pages are kept under "usr/share/man/man1".
$ whereis gcc
gcc: /usr/bin/gcc.exe /usr/lib/gcc /usr/share/man/man1/gcc.1.gz
Getting Started
The GNU C and C++ compiler are called gcc and g++, respectively.
Compile/Link a Simple C Program - hello.c
Below is the Hello-world C program hello.c:
1 2 3 4 5 6 7 |
// hello.c
#include <stdio.h>

int main() {
    printf("Hello, world!\n");
    return 0;
}
|
To compile the hello.c:
> gcc hello.c
  // Compile and link source file hello.c into executable a.exe (Windows) or a (Unixes)
The default output executable is called "a.exe" (Windows) or "a.out" (Unixes and Mac OS X).
To run the program:
// (Windows) In CMD shell
> a

// (Unixes / Mac OS X) In Bash Shell - include the current path (./)
$ chmod a+x a.out
$ ./a.out
Notes for Unixes and Bash Shell:
- In Bash shell, the default PATH does not include the current working directory. Hence, you need to include the current path (
./) in the command. (Windows include the current directory in the PATH automatically; whereas Unixes do not - you need to include the current directory explicitly in the PATH.) - You also need to include the file extension, if any, i.e., "
./a.out". - In Unixes, the output file could be "
a.out" or simply "a". Furthermore, you need to assign executable file-mode (x) to the executable file "a.out", via command "chmod a+x filename" (add executable file-mode "+x" to all users "a+x").
To specify the output filename, use -o option:
// (Windows) In CMD shell
> gcc -o hello.exe hello.c
  // Compile and link source file hello.c into executable hello.exe
> hello
  // Execute hello.exe under CMD shell

// (Unixes / Mac OS X) In Bash shell
$ gcc -o hello hello.c
$ chmod a+x hello
$ ./hello
NOTE for Unixes:
- In Unixes, we typically omit the
.exefile extension (meant for Windows only), and simply name the output executable ashello(via command "gcc -o hello hello.c". - You need to assign executable file mode via command "
chmod a+x hello".
Compile/Link a Simple C++ Program - hello.cpp
1 2 3 4 5 6 7 8 |
// hello.cpp
#include <iostream>
using namespace std;

int main() {
   cout << "Hello, world!" << endl;
   return 0;
}
|
You need to use g++ to compile C++ program, as follows. We use the -o option to specify the output file name.
// (Windows) In CMD shell
> g++ -o hello.exe hello.cpp
   // Compile and link source hello.cpp into executable hello.exe
> hello
   // Execute under CMD shell

// (Unixes / Mac OS X) In Bash shell
$ g++ -o hello hello.cpp
$ chmod a+x hello
$ ./hello
More GCC Compiler Options
A few commonly-used GCC compiler options are:
$ g++ -Wall -g -o Hello.exe Hello.cpp
-o: specifies the output executable filename.-Wall: prints "all" Warning messages.-g: generates additional symbolic debuggging information for use withgdbdebugger.
Compile and Link Separately
The above command compile the source file into object file and link with other object files and system libraries into executable in one step. You may separate compile and link in two steps as follows:
// Compile-only with -c option
> g++ -c -Wall -g Hello.cpp
// Link object file(s) into an executable
> g++ -g -o Hello.exe Hello.o
The options are:
-c: Compile into object file "Hello.o". By default, the object file has the same name as the source file with extension of ".o" (there is no need to specify-ooption). No linking with other object files or libraries.- Linking is performed when the input file are object files "
.o" (instead of source file ".cpp" or ".c"). GCC uses a separate linker program (calledld.exe) to perform the linking.
Compile and Link Multiple Source Files
Suppose that your program has two source files: file1.cpp, file2.cpp. You could compile all of them in a single command:
> g++ -o myprog.exe file1.cpp file2.cpp
However, we usually compile each of the source files separately into object file, and link them together in the later stage. In this case, changes in one file does not require re-compilation of the other files.
> g++ -c file1.cpp
> g++ -c file2.cpp
> g++ -o myprog.exe file1.o file2.o
Compile into a Shared Library
To compile and link C/C++ program into a shared library (".dll" in Windows, ".so" in Unixes), use -shared option. Read "Java Native Interface" for example.
GCC Compilation Process
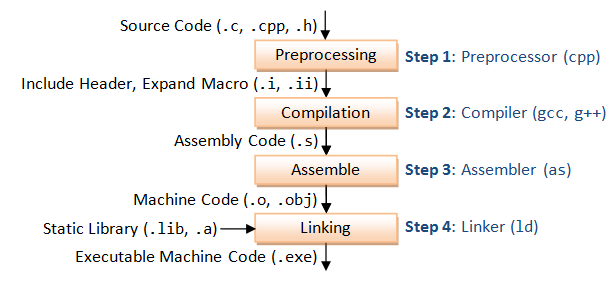
GCC compiles a C/C++ program into executable in 4 steps as shown in the above diagram. For example, a "gcc -o hello.exe hello.c" is carried out as follows:
- Pre-processing: via the GNU C Preprocessor (
cpp.exe), which includes the headers (#include) and expands the macros (#define).> cpp hello.c > hello.i
The resultant intermediate file "hello.i" contains the expanded source code. - Compilation: The compiler compiles the pre-processed source code into assembly code for a specific processor.
> gcc -S hello.i
The-Soption specifies to produce assembly code, instead of object code. The resultant assembly file is "hello.s". - Assembly: The assembler (
as.exe) converts the assembly code into machine code in the object file "hello.o".> as -o hello.o hello.s
- Linker: Finally, the linker (
ld.exe) links the object code with the library code to produce an executable file "hello.exe".> ld -o hello.exe hello.o ...libraries...
Verbose Mode (-v)
You can see the detailed compilation process by enabling -v (verbose) option. For example,
> gcc -v -o hello.exe hello.c
Defining Macro (-D)
You can use the -Dname option to define a macro, or -Dname=value to define a macro with a value. The value should be enclosed in double quotes if it contains spaces.
Headers (.h), Static Libraries (.lib, .a) and Shared Library (.dll, .so)
Static Library vs. Shared Library
A library is a collection of pre-compiled object files that can be linked into your programs via the linker. Examples are the system functions such as printf() and sqrt().
There are two types of external libraries: static library and shared library.
- A static library has file extension of "
.a" (archive file) in Unixes or ".lib" (library) in Windows. When your program is linked against a static library, the machine code of external functions used in your program is copied into the executable. A static library can be created via the archive program "ar.exe". - A shared library has file extension of "
.so" (shared objects) in Unixes or ".dll" (dynamic link library) in Windows. When your program is linked against a shared library, only a small table is created in the executable. Before the executable starts running, the operating system loads the machine code needed for the external functions - a process known as dynamic linking. Dynamic linking makes executable files smaller and saves disk space, because one copy of a library can be shared between multiple programs. Furthermore, most operating systems allows one copy of a shared library in memory to be used by all running programs, thus, saving memory. The shared library codes can be upgraded without the need to recompile your program.
Because of the advantage of dynamic linking, GCC, by default, links to the shared library if it is available.
You can list the contents of a library via "nm filename".
Searching for Header Files and Libraries (-I, -L and -l)
When compiling the program, the compiler needs the header files to compile the source codes; the linker needs the libraries to resolve external references from other object files or libraries. The compiler and linker will not find the headers/libraries unless you set the appropriate options, which is not obvious for first-time user.
For each of the headers used in your source (via #include directives), the compiler searches the so-called include-paths for these headers. The include-paths are specified via -Idir option (or environment variable CPATH). Since the header's filename is known (e.g., iostream.h, stdio.h), the compiler only needs the directories.
The linker searches the so-called library-paths for libraries needed to link the program into an executable. The library-path is specified via -Ldir option (uppercase 'L' followed by the directory path) (or environment variable LIBRARY_PATH). In addition, you also have to specify the library name. In Unixes, the library libxxx.a is specified via -lxxx option (lowercase letter 'l', without the prefix "lib" and ".a" extension). In Windows, provide the full name such as -lxxx.lib. The linker needs to know both the directories as well as the library names. Hence, two options need to be specified.
Default Include-paths, Library-paths and Libraries
Try list the default include-paths in your system used by the "GNU C Preprocessor" via "cpp -v":
> cpp -v
......
#include "..." search starts here:
#include <...> search starts here:
 /usr/lib/gcc/x86_64-pc-cygwin/6.4.0/include
 /usr/include
 /usr/lib/gcc/x86_64-pc-cygwin/6.4.0/../../../../lib/../include/w32api
Try running the compilation in verbose mode (-v) to study the library-paths (-L) and libraries (-l) used in your system:
> gcc -v -o hello.exe hello.c
......
-L/usr/lib/gcc/x86_64-pc-cygwin/6.4.0
-L/usr/x86_64-pc-cygwin/lib
-L/usr/lib
-L/lib
-lgcc_s     // libgcc_s.a
-lgcc       // libgcc.a
-lcygwin    // libcygwin.a
-ladvapi32  // libadvapi32.a
-lshell32   // libshell32.a
-luser32    // libuser32.a
-lkernel32  // libkernel32.a
Eclipse CDT: In Eclipse CDT, you can set the include paths, library paths and libraries by right-click on the project ⇒ Properties ⇒ C/C++ General ⇒ Paths and Symbols ⇒ Under tabs "Includes", "Library Paths" and "Libraries". The settings are applicable to the selected project only.
GCC Environment Variables
GCC uses the following environment variables:
PATH: For searching the executables and run-time shared libraries (.dll,.so).CPATH: For searching the include-paths for headers. It is searched after paths specified in-I<dir>options.C_INCLUDE_PATHandCPLUS_INCLUDE_PATHcan be used to specify C and C++ headers if the particular language was indicated in pre-processing.LIBRARY_PATH: For searching library-paths for link libraries. It is searched after paths specified in -L<dir>options.
Utilities for Examining the Compiled Files
For all the GNU utilities, you can use "command --help" to list the help menu; or "man command" to display the man pages.
"file" Utility - Determine File Type
The utility "file" can be used to display the type of object files and executable files. For example,
$ gcc -c hello.c
$ gcc -o hello.exe hello.o

$ file hello.c
hello.c: C source, ASCII text, with CRLF line terminators

$ file hello.o
hello.o: data

> file hello.exe
hello.exe: PE32 executable (console) x86-64, for MS Windows
"nm" Utility - List Symbol Table of Object Files
The utility "nm" lists symbol table of object files. For example,
$ nm hello.o
0000000000000000 b .bss
0000000000000000 d .data
0000000000000000 p .pdata
0000000000000000 r .rdata
0000000000000000 r .rdata$zzz
0000000000000000 t .text
0000000000000000 r .xdata
                 U __main
0000000000000000 T main
                 U puts

$ nm hello.exe | grep main
00000001004080cc I __imp___main
0000000100401120 T __main
00000001004010e0 T main
......
"nm" is commonly-used to check if a particular function is defined in an object file. A 'T' in the second column indicates a function that is defined, while a 'U' indicates a function which is undefined and should be resolved by the linker.
"ldd" Utility - List Dynamic-Link Libraries
The utility "ldd" examines an executable and displays a list of the shared libraries that it needs. For example,
> ldd hello.exe
ntdll.dll => /cygdrive/c/WINDOWS/SYSTEM32/ntdll.dll (0x7ff9ba3c0000)
KERNEL32.DLL => /cygdrive/c/WINDOWS/System32/KERNEL32.DLL (0x7ff9b9880000)
KERNELBASE.dll => /cygdrive/c/WINDOWS/System32/KERNELBASE.dll (0x7ff9b6a60000)
SYSFER.DLL => /cygdrive/c/WINDOWS/System32/SYSFER.DLL (0x6ec90000)
ADVAPI32.dll => /cygdrive/c/WINDOWS/System32/ADVAPI32.dll (0x7ff9b79a0000)
msvcrt.dll => /cygdrive/c/WINDOWS/System32/msvcrt.dll (0x7ff9b9100000)
sechost.dll => /cygdrive/c/WINDOWS/System32/sechost.dll (0x7ff9b9000000)
RPCRT4.dll => /cygdrive/c/WINDOWS/System32/RPCRT4.dll (0x7ff9b9700000)
cygwin1.dll => /usr/bin/cygwin1.dll (0x180040000)
GNU Make
The "make" utility automates the mundane aspects of building executable from source code. "make" uses a so-called makefile, which contains rules on how to build the executables.
You can issue "make --help" to list the command-line options; or "man make" to display the man pages.
First Makefile By Example
Let's begin with a simple example to build the Hello-world program (hello.c) into executable (hello.exe) via make utility.
1 2 3 4 5 6 7 |
// hello.c
#include <stdio.h>

int main() {
    printf("Hello, world!\n");
    return 0;
}
|
Create the following file named "makefile" (without any file extension), which contains rules to build the executable, and save in the same directory as the source file. Use "tab" to indent the command (NOT spaces).
all: hello.exe

hello.exe: hello.o
	 gcc -o hello.exe hello.o

hello.o: hello.c
	 gcc -c hello.c

clean:
	 rm hello.o hello.exe
Run the "make" utility as follows:
> make
gcc -c hello.c
gcc -o hello.exe hello.o
Running make without argument starts the target "all" in the makefile. A makefile consists of a set of rules. A rule consists of 3 parts: a target, a list of pre-requisites and a command, as follows:
target: pre-req-1 pre-req-2 ...
	command
The target and pre-requisites are separated by a colon (:). The command must be preceded by a tab (NOT spaces).
When make is asked to evaluate a rule, it begins by finding the files in the prerequisites. If any of the prerequisites has an associated rule, make attempts to update those first.
In the above example, the rule "all" has a pre-requisite "hello.exe". make cannot find the file "hello.exe", so it looks for a rule to create it. The rule "hello.exe" has a pre-requisite "hello.o". Again, it does not exist, so make looks for a rule to create it. The rule "hello.o" has a pre-requisite "hello.c". make checks that "hello.c" exists and it is newer than the target (which does not exist). It runs the command "gcc -c hello.c". The rule "hello.exe" then run its command "gcc -o hello.exe hello.o". Finally, the rule "all" does nothing.
More importantly, if the pre-requisite is not newer than than target, the command will not be run. In other words, the command will be run only if the target is out-dated compared with its pre-requisite. For example, if we re-run the make command:
> make
make: Nothing to be done for `all'.
You can also specify the target to be made in the make command. For example, the target "clean" removes the "hello.o" and "hello.exe". You can then run the make without target, which is the same as "make all".
> make clean
rm hello.o hello.exe

> make
gcc -c hello.c
gcc -o hello.exe hello.o
Try modifying the "hello.c" and run make.
NOTES:
- If the command is not preceded by a tab, you get an error message "makefile:4: *** missing separator. Stop."
- If there is no
makefilein the current directory, you get an error message "make: *** No targets specified and no makefile found. Stop." - The makefile can be named "
makefile", "Makefile" or "GNUMakefile", without file extension.
More on Makefile
Comment & Continuation
A comment begins with a # and lasts till the end of the line. Long line can be broken and continued in several lines via a back-slash (\).
Syntax of Rules
A general syntax for the rules is:
target1 [target2 ...]: [pre-req-1 pre-req-2 ...]
	[command1
	 command2
	 ......]
The rules are usually organized in such as way the more general rules come first. The overall rule is often name "all", which is the default target for make.
Phony Targets (or Artificial Targets)
A target that does not represent a file is called a phony target. For example, the "clean" in the above example, which is just a label for a command. If the target is a file, it will be checked against its pre-requisite for out-of-date-ness. Phony target is always out-of-date and its command will be run. The standard phony targets are: all, clean, install.
Variables
A variable begins with a $ and is enclosed within parentheses (...) or braces {...}. Single character variables do not need the parentheses. For example, $(CC), $(CC_FLAGS), $@, $^.
Automatic Variables
Automatic variables are set by make after a rule is matched. There include:
$@: the target filename.$*: the target filename without the file extension.$<: the first prerequisite filename.$^: the filenames of all the prerequisites, separated by spaces, discard duplicates.$+: similar to$^, but includes duplicates.$?: the names of all prerequisites that are newer than the target, separated by spaces.
For example, we can rewrite the earlier makefile as:
all: hello.exe

# $@ matches the target; $< matches the first dependent
hello.exe: hello.o
	gcc -o $@ $<

hello.o: hello.c
	gcc -c $<

clean:
	rm hello.o hello.exe
Virtual Path - VPATH & vpath
You can use VPATH (uppercase) to specify the directory to search for dependencies and target files. For example,
# Search for dependencies and targets from "src" and "include" directories
# The directories are separated by space
VPATH = src include
You can also use vpath (lowercase) to be more precise about the file type and its search directory. For example,
# Search for .c files in "src" directory; .h files in "include" directory
# The pattern matching character '%' matches filename without the extension
vpath %.c src
vpath %.h include
Pattern Rules
A pattern rule, which uses pattern matching character '%' as the filename, can be applied to create a target, if there is no explicit rule. For example,
# Applicable for create .o object file.
# '%' matches filename.
# $< is the first pre-requisite
# $(COMPILE.c) consists of compiler name and compiler options
# $(OUTPUT_OPTIONS) could be -o $@
%.o: %.c
	$(COMPILE.c) $(OUTPUT_OPTION) $<

# Applicable for create executable (without extension) from object .o object file
# $^ matches all the pre-requisites (no duplicates)
%: %.o
$(LINK.o) $^ $(LOADLIBES) $(LDLIBS) -o $@
Implicit Pattern Rules
Make comes with a huge set of implicit pattern rules. You can list all the rule via --print-data-base option.
A Sample Makefile
This sample makefile is extracted from Eclipse's "C/C++ Development Guide -Makefile".
# A sample Makefile
# This Makefile demonstrates and explains
# Make Macros, Macro Expansions,
# Rules, Targets, Dependencies, Commands, Goals
# Artificial Targets, Pattern Rule, Dependency Rule.

# Comments start with a # and go to the end of the line.

# Here is a simple Make Macro.
LINK_TARGET = test_me.exe

# Here is a Make Macro that uses the backslash to extend to multiple lines.
OBJS =  \
 Test1.o \
 Test2.o \
 Main.o

# Here is a Make Macro defined by two Macro Expansions.
# A Macro Expansion may be treated as a textual replacement of the Make Macro.
# Macro Expansions are introduced with $ and enclosed in (parentheses).
REBUILDABLES = $(OBJS) $(LINK_TARGET)

# Here is a simple Rule (used for "cleaning" your build environment).
# It has a Target named "clean" (left of the colon ":" on the first line),
# no Dependencies (right of the colon),
# and two Commands (indented by tabs on the lines that follow).
# The space before the colon is not required but added here for clarity.
clean :
  rm -f $(REBUILDABLES)
  echo Clean done

# There are two standard Targets your Makefile should probably have:
# "all" and "clean", because they are often command-line Goals.
# Also, these are both typically Artificial Targets, because they don't typically
# correspond to real files named "all" or "clean".

# The rule for "all" is used to incrementally build your system.
# It does this by expressing a dependency on the results of that system,
# which in turn have their own rules and dependencies.
all : $(LINK_TARGET)
  echo All done

# There is no required order to the list of rules as they appear in the Makefile.
# Make will build its own dependency tree and only execute each rule only once
# its dependencies' rules have been executed successfully.

# Here is a Rule that uses some built-in Make Macros in its command:
# $@ expands to the rule's target, in this case "test_me.exe".
# $^ expands to the rule's dependencies, in this case the three files
# main.o, test1.o, and  test2.o.
$(LINK_TARGET) : $(OBJS)
  g++ -g -o $@ $^

# Here is a Pattern Rule, often used for compile-line.
# It says how to create a file with a .o suffix, given a file with a .cpp suffix.
# The rule's command uses some built-in Make Macros:
# $@ for the pattern-matched target
# $< for the pattern-matched dependency
%.o : %.cpp
  g++ -g -o $@ -c $<

# These are Dependency Rules, which are rules without any command.
# Dependency Rules indicate that if any file to the right of the colon changes,
# the target to the left of the colon should be considered out-of-date.
# The commands for making an out-of-date target up-to-date may be found elsewhere
# (in this case, by the Pattern Rule above).
# Dependency Rules are often used to capture header file dependencies.
Main.o : Main.h Test1.h Test2.h
Test1.o : Test1.h Test2.h
Test2.o : Test2.h

# Alternatively to manually capturing dependencies, several automated
# dependency generators exist.  Here is one possibility (commented out)...
# %.dep : %.cpp
#   g++ -M $(FLAGS) $< > $@
# include $(OBJS:.o=.dep)
Brief Summary
I have presented the basic make features here so that you can read and understand simple makefiles for building C/C++ applications. Make is actually quite complex, and can be considered as a programming language by itself!!
REFERENCES & RESOURCES
- GCC Manual "Using the GNU Compiler Collection (GCC)" @ http://gcc.gnu.org/onlinedocs.
- GNU 'make' manual @ http://www.gnu.org/software/make/manual/make.html.
- Robert Mecklenburg, "Managing Projects with GNU Make", 3rd Edition, 2004.