Introduction
Android is an Operating System for mobile devices developed by Google, which is built upon Linux kernel. Android competes with Apple's iOS (for iPhone/iPad), RIM's Blackberry(?), Microsoft's Windows Phone(?), Symbian OS(?), and many other proprietary mobile OSes.
Brief History and Versions
- In 2005, Google acquired a start-up called Android Inc. and started to work on the Android platform, in particular the Dalvik Java Virtual Machine (JVM).
- In 2007, a group of mobile handset producers and computing companies (including Google, Samsung, Motorola, Sony Ericsson, Intel, T-mobile, and Vodaphone) formed the
Open Handset Alliance
(OHA) to develop an open and non-proprietary mobile operating platform. The Android beta version was released in November 2007. - In September 2008, Google released Android SDK 1.0, and placed it under open-source license. Android 1.x did not support soft keyboard and required physical keypad. Android 1.5 (codenamed Cupcake - Android versions are codenamed after desserts) fixed this problem and including new features such as media recording and playback, widgets, and added supports to native codes. Android 1.6 (Donut) introduced support for different screen resolutions.
- In October 2009, Google released Android SDK 2.0 (Éclair), which supports HTML 5, flash and multi-touch screens. Android 2.2 (Froyo) added just-in-time (JIT) compilation to the Dalvik virtual machine, which greatly improves the performance. Android 2.3 (Gingerbread) added supports for the OpenGL ES 2.0, and a new concurrent garbage collector to the Dalvik VM.
- In March 2011, Google released Android SDK 3.0 (Honeycomb) - the first tablet-only Android platform. Android 3.0 supports wide screen and multi-core processors, and USB peripherals. Android 3.0 does not run on smart phones.
- Android 4.0 (Ice Cream Sandwich) was released in October 2011, which is the result of merging Honeycomb (3.1) and Gingerbread (2.3) to support both smart phones and tablets.
- Android 4.1 (Jelly Bean) was released in June 2012. It introduces the new features such as new Google search experience.
- Android 4.4 (Kitkat) was released in October 2013, which is optimized to run on a greater range of devices.
- Android 5 (Lollipop) was released in November 2014.
- Android 6 (Marshmallow) was released in October 2015.
- Android 7 (Nougat) was released in August 2016; and Android 7.1 in October 2016.
- Android 8 (Oreo) was released in August 2017; and Android 8.1 in December 2017.
- Android 9 (Pie) was released in August 2018.
- Android 10 (Q) was released in September 2019.
- Android 11 (R) was released in September 2020.
- Android 12 (S) was released in October 2021.
- Android 13 (Tiramisu) was released in August 2022.
- Android 14 (Upside Down Cake) was released in October 2023.
- Android 15 (Vanilla Ice Cream)?
Android platform is identified by two numbers: a version name (x.y) and an API level number (a running integer starts from 1, which is used in the Android Market/Google Play to identify new version).
| Year | Version | Codename | API Level |
|---|---|---|---|
| 2009, Apr | 1.5 | Cupcake | 3 |
| 2009, Sep | 1.6 | Donut | 4 |
| 2009, Oct | 2.0 - 2.1 | Eclair | 7 |
| 2010, Mar | 2.2 | Froyo | 8 |
| 2010, Dec | 2.3 - 2.3.2 | Gingerbread | 9 |
| 2.3.3 - 2.3.7 | 10 | ||
| 2011, Feb | 3.0 | Honeycomb | 11 |
| 3.1 | 12 | ||
| 3.2 | 13 | ||
| 2011, Oct | 4.0 - 4.0.2 | Ice Cream Sandwich | 14 |
| 4.0.3 - 4.0.4 | 15 | ||
| 2012, Jun | 4.1 | Jelly Bean | 16 |
| 4.2 | 17 | ||
| 4.3 | 18 | ||
| 2013, Oct | 4.4 | KitKat | 19 |
| 2014, Nov | 5.0 | Lollipop | 21 |
| 2015, Mar | 5.1 | 22 | |
| 2015, Oct | 6.0 | Marshmallow | 23 |
| 2016, Aug | 7.0 | Nougat | 24 |
| 2016, Oct | 7.1 | 25 | |
| 2017, Aug | 8.0 | Oreo | 26 |
| 2017, Dec | 8.1 | 27 | |
| 2018, Aug | 9 | Pie | 28 |
| 2019, Sep | 10 | 10 (Q) | 29 |
| 2020, Sep | 11 | 11 (R) | 30 |
| 2021, Oct | 12, 12L | 12 (S) | 31, 32 |
| 2022, Aug | 13 | Tiramisu | 33 |
| 2023, Oct | 14 | Upside Down Cake | 34 |
| 2024, Feb (preview) | 15 | Vanilla Ice Cream |

The mascot for Android is a little green robot, who is still nameless. A new version was created in 2019 with the introduction of Android 10 (Q) - and no more desserts.
The Android Platform
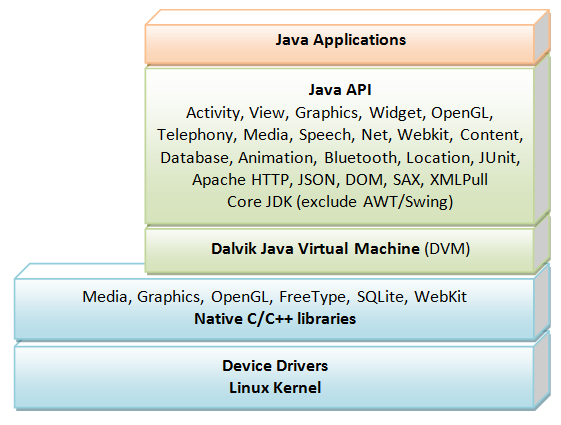
Linux Kernel and Device Drivers
The Linux kernel is responsible for the OS functions, such as processor, memory, file, power management. The device drivers includes display, camera, keypad, flash memory, communications (GSM telephony, 3G, WiFi, bluetooth, Near-Field Contact-less communication), accessories (GPS, compass, accelerator), and etc.
Dalvik Virtual Machine
Dalvik VM (DVM) was developed by Google, led by Dan Bornstein, to optimize the performance of Java applications on mobile devices with limited capabilities (Dalvik is actually the name of a town in Iceland). DVM takes the traditional Java classes (".class") and combines them into one or more Dalvik Executable (".dex") files. By removing duplicate information among the Java classes, it reduces the resultant file size compared with the traditional JAR file. However, as a result, the DVM is not binary-compatible with Java Virtual Machine (JVM). You need to convert the ".class" into ".dex".
Android 2.2 (Froyo) added a JIT (Just-in-time) compiler and Android 2.3 (Gingerbread) added a concurrent garbage collector to improve the runtime performance.
Android SDK uses XML file extensively. All the XML files are compiled into binary files to improve the performance.
Native C/C++ Libraries
The native C/C++ libraries include:
- Google's Skia: for 2D graphics support (also used in Google's Chrome).
- Khronos Group's OpenGL ES: for 3D graphics support.
- WebKit: for browser support (also used in Google's Chrome).
- FreeType: for font support.
- SSL (Secure Socket Layer): for secure communications.
- SQLite: a lightweight relational database system.
- PacketVideo's OpenCore: video/audio record and playback in various format.
- Others.
Android Java API Packages
The API reference is available @ http://developer.android.com/reference/packages.html.
android.app:android.view,android.widget:android.graphics,android.animation:android.media,android.speech,android.telephony:android.net:android.bluetooth,android.location:android.provider,android.content,android.database:android.gesture:android.sax:android.security:android.test,junit.framework,junit.runner:android.text,android.util:java.lang,java.io,java.nio,java.text,java.utiljava.net,javax.net:java.security,java.crypto:java.sql,javax.sql:javax.xml,org.json,org,w3c.dom,org.xml.sax,org.xmlpull:org.apache.http:
Android supports a subset of JavaSE (no AWT and Swing). There is no JavaME library in Android.
Kotlin Programming Language
In May 2017, Google announced support for Android app development in the Kotlin programming language, supported in Android Studio 3.0. "Kotlin is a statically-typed programming language that runs on the Java virtual machine and also can be compiled to JavaScript source code. While the syntax is not compatible with Java, Kotlin is designed to interoperate with Java code and is reliant on Java code from the existing Java Class Library, such as the collections framework."
Android Application Framework
Android application framework is radically different from traditional programming frameworks, such as C/C++ and Java. There is no single entry point (you can't find the main()?!). This is because the Android apps are targeted at mobile devices with limited capabilities. "Reusing" components from other applications is crucial to reduce their footprint.
Android applications consist of components, and can communicate and use components of other applications seamlessly (e.g., making a phone call, or taking a photo), without including the codes of the other applications or linking to it. An Android app can simply start other application's component by instantiate Java objects for that component. An Android application does not have a single entry point (there is no main() method), but consists of components that can be instantiated and run as the need arises.
There are four main types of application components:
- Activity: An activity has a single screen, which usually composes of one of more views. An activity interacts with the user to perform one task.
- Service: Background processes (similar to Windows' service or Unix's daemon), e.g., playing music.
- Broadcast Receiver: Receives and reacts to system messages, e.g., low battery life.
- Content Provider: Android defines a content provider mechanism for applications to share data without exposing the underlying implementation. Via content provider, your application can share data with other applications, or use data from another application (e.g., from SQLite Database).
Android Programming Basics
Android Developer Website
The Android developer website @ https://developer.android.com, is crucial for developing Android app. It has three main items: Design, Develop, and Distribute. Begin with the "Develop", which contains Android Training, API Guides, Reference and Tools. In this article, I shall follow closely with "Android Training" and "API Guides", but explain in my perspective.
Revisit Hello-world
(Stop the current app. Close the current project. Open the "Hello Android" app created earlier.)
Let us revisit the Hello-world program, reproduced as follow:
package ......;
import ......
import android.widget.TextView;

public class MainActivity extends ...Activity {
    /** Callback when the activity is first created. */
    @Override
    public void onCreate(Bundle savedInstanceState) {
        super.onCreate(savedInstanceState);
        TextView textView = new TextView(this); // Construct a TextView UI component
        textView.setText("hello world, from my Java codes!");   // Set text for TextView
        setContentView(textView);               // This Activity sets its content to the TextView
    }

    ......
}
Activity
An Android application typically comprises several activities (screens). An activity has a single screen, which usually composes of one of more views. An activity, as its name implied, interacts with the user to do ONE (and only ONE) thing, such as viewing data, creating data, or editing data.
View
Views are UI components (or widget, or control) (such as button, label, text field) as well as containers (of components), that could be used to build the user interface. In the Hello-world, we use a view called TextView to display the message.
Android supports many core JDK packages, except graphics packages AWT and Swing. It provides its own 2D graphics supports, via views and widgets. It supports 3D graphics via OpenGL ES.
Fragment
Fragment was introduced in Android 3.0 to support wider screen, which could be difficult to put all the functions in a single activity. Fragments are like sub-activities. An activity can display one or more fragments on the screen at the same time. For a smaller screen, an activity is more likely to contain just one fragment.
AndroidManifest.xml
Each application has a manifest, or application descriptor, to describe its contents, resources and behaviors, such as the list of activities, services, intents and permissions. For example, the hello-world's manifest is as follow:
<?xml ......?>
<manifest ......>

    <application
        ......
        android:label="Hello Android"
        ......>
        <activity
            android:name=".MainActivity">
            <intent-filter>
                <action android:name="android.intent.action.MAIN" />
                <category android:name="android.intent.category.LAUNCHER" />
            </intent-filter>
        </activity>
    </application>
</manifest>
- The root element
<manifest>defines the XML name space and Java package name. It contains one<application>. - The
<application>element specifies the icon, label and theme for this app. It contains one or more<activity>. - This application has one activity. The
<activity>element declares its Java class name ("MainActivity" in packagecom.example.helloandroid); and label (to be displayed as the screen title). It may contain<intent-filter>to declare the intent for this activity. - The
<intent-filter>declares that this activity is the entry point (android.intent.action.MAIN) of the application. This activity is to be added to the application launcher (android.intent.category.LAUNCHER).
(The Android Application Descriptor file AndroidManifest.xml is similar to Web Application Deployment Descriptor web.xml in a JavaEE web application.)
Intent
An intent, as its name implied, declares an intention to do something, such as launching an activity, broadcasting a message, starting a service, display a web page, dialing or answering a phone call. An intent could be initiated by your application, or by the system to notify your application about a specific event (such as an incoming phone call or text message). Intents are like "glue" that enable different activities from different applications to work together.
For example, the <intent-filter> in the above manifest declares that this activity is the entry point (android.intent.action.MAIN) of the application, and it shall be added to be application launcher (android.intent.category.LAUNCHER).
Activities
As mentioned, an activity is usually presented in a single SCREEN composing of views (UI components, widgets or controls), which interacts with the users to perform a single, focused task (e.g., viewing information, editing data, or entering data).
An Android app typically has one or more activities (one or more screens). One of the activities is marked as the startup activity, which in turn starts the next activity, via the intent.
To create an activity, we extend the android.app.Activity class (or androidx.appcompat.app.AppCompatActivity from Android 13), and override some of its methods (in particular onCreate()) to provide our own implementation. A typical template of an Activity is as follows:
package com.example.......;

import android.app.Activity;
import android.os.Bundle;

public class MainActivity extends ...Activity {  // extends AppCompatActivity from Android 13
    /** Callback when the activity is first created. */
    @Override
    protected void onCreate(Bundle savedInstanceState) {
        super.onCreate(savedInstanceState);
        ......
        setContentView(......); // Set the content-view of this Activity's screen

        // To use XML Layout, use
        //   setContentView(R.layout.xxx);
        // to map layout specified in res/layout/xxx.xml
    }
}
You can set this activity's content-view grammatically or via a XML layout file.
User Interface - Views, ViewGroups and Resources
An Activity interacts with the user, via a visual UI on a screen. The UI is placed on the Activity via the Activity's setContentView() method. In Android, the UI composes of View and ViewGroup objects, organized in a single view-tree structure.
A View is an interactive UI component (or widget or control), such as button and text field. It controls a rectangular area on the screen. It is responsible for drawing itself and handling events (such as clicking, entering texts). Android provides many ready-to-use Views such as TextView, EditText, Button, RadioButton, etc, in package android.widget. You can also create your custom View by extending android.view.View.
A ViewGroup is an invisible container used to layout the View components. Android provides many ready-to-use ViewGroups such as LinearLayout, RelativeLayout, TableLayout and GridLayout in package android.widget. You can also create your custom ViewGroup by extending from android.view.ViewGroup.
Views and ViewGroups are organized in a single tree structure called view-tree. You can create a view-tree either using programming codes or describing it in a XML layout file. XML layout is recommended as it separates the presentation view from the controlling logic, which provides modularity and flexibility in your program design. Once a view-tree is constructed, you can add the root of the view-tree to the Activity as the content view via Activity's setContentView() method.
There are two approaches in constructing the UI:
- Via the XML Layout file: For example, in "Hello-world in XML Layout", we layout all the UI components in an XML file. This approach is more flexible, with the view separated from the business logic, and therefore recommended.
- Via the programming codes, as in the above Hello-world example. Use this approach only if absolutely necessary.
Example 1: Views (TextView, RadioButton, Button) and ViewGroup (LinearLayout)
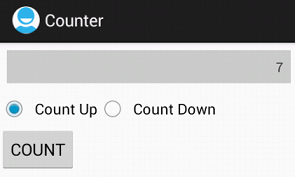
Let's illustrate the view-tree with a simple "Counter" example as illustrated.
The UI consists of a "text field" (android.widget.TextView), two "radio buttons" (android.widget.RadioButton) and a "button" (android.widget.Button), arranged in "linear layout" (android.widget.LinearLayout).
Close the previous project, via "File" ⇒ Close Project.
"Start an Android Studio project" (or "New Project"), "Empty View Activity", with "Name" of "Counter".
Step 1a: Define Layout in "res\layout\activity_main.xml"
Expand the project node, and REPLACE the "res\layout\activities_main.xml" with the following codes:
<?xml version="1.0" encoding="utf-8"?>
<LinearLayout xmlns:android="http://schemas.android.com/apk/res/android"
    xmlns:app="http://schemas.android.com/apk/res-auto"
    xmlns:tools="http://schemas.android.com/tools"
    android:layout_width="match_parent"
    android:layout_height="match_parent"
    android:orientation="vertical"
    tools:context="com.example.counter.MainActivity"
    tools:showIn="@layout/activity_main">

    <TextView
        android:id="@+id/txtCountId"
        android:layout_width="match_parent"
        android:layout_height="wrap_content"
        android:background="#cccccc"
        android:gravity="end"
        android:padding="@dimen/padding_medium"
        android:layout_margin="@dimen/padding_small" />

    <RadioGroup
        android:layout_width="wrap_content"
        android:layout_height="wrap_content"
        android:orientation="horizontal" >
        <RadioButton
            android:id="@+id/rBtnUpId"
            android:text="@string/rBtnUpLabel"
            android:layout_width="wrap_content"
            android:layout_height="wrap_content"
            android:checked="true" />
        <RadioButton
            android:id="@+id/rBtnDownId"
            android:text="@string/rBtnDownLabel"
            android:layout_width="wrap_content"
            android:layout_height="wrap_content" />
    </RadioGroup>

    <Button
        android:id="@+id/btnCountId"
        android:text="@string/btnCountLabel"
        android:layout_width="wrap_content"
        android:layout_height="wrap_content" />
</LinearLayout>
There will be errors on @string and @dimen. These are references (variables), which we shall define later.
The "activity_main.xml" layout file describes a view-tree, composing of Views (UI components) and ViewGroups (layouts) objects. The root of this view-tree is a LinearLayout, which has 3 children: TextView, RadioGroup and Button. RadioGroup is also a layout ViewGroup which has two children of RadioButton.
Each object has its own set of properties (or attributes). The common attributes are:
- id: an identifier (or variable name) used for referencing the object. We use a special syntax
@+id/idName, with a'+'to ask the Android SDK to generate a new ID resource. To reference an element, we use syntax@id/idName, without the'+'sign.
For example, in theButtondeclaration, we generate a newidcalledbtnCountIdas follow:<Button android:id="@+id/btnCountId" ...... />Once theidis set up, we can use thisidto reference the object and manipulate the object in our programming codes later. - layout_width/layout_height: specifying the rectangular area of the
VieworViewGroup. It is recommended to use a relative measurement, such asMATCH_PARENT(as big as its parent) orWRAP_CONTENT(big enough to enclose its content). You can also provide an absolute measurement by specifying a floating-point number with a unit, e.g., 12.5dp. The available measurement units are px (pixels), dp or dip (density-independent pixels), sp (scaled pixels based on preferred font size), in (inches), and mm (millimeters).
In our example, theLinearLayoutfills the screen width and height (layout_width="match_parent",layout_height="match_parent"). TheTextViewfill the screen's width (layout_width="match_parent"), with a height big enough to enclose its content (layout_height="wrap_content"). TheRadioGroup,RadioButtonandButtonhave width and height big enough to hold their contents (layout_width="wrap_content",layout_height="wrap_content"). - orientation="horizontal|vertical": For layouts such as
LinearLayoutandRadioGroup, you can specify whether to arrange its children in horizontal or vertical orientation. In our example, theLinearLayoutuses vertical orientation, whileRadioGroupuses horizontal. - text: specifying an initial text for a text field, or a label for a button. Instead of hardcoding the text in the XML layout file, it is recommended to provide a string reference in the form of
@string/stringNamein the layout file, and place the actual text in "res\values\strings.xml". In this way, you could provide different strings for different locales (languages and countries) for internationalization (i18n) support.
For this example, we used string referencesrBtnUpLabelandrBtnDownLabel(forRadioButton) andbtnCountLabel(forButton). - others: There are many other attributes. Some attributes are applicable to a certain object only. For example, we use
checked="true"to set the initial state of aRadioButton. For theTextView, we use"background="#cccccc"to set its background to lightgrey (#RRGGBB),gravity="right"to right-align the text,layout_margin="@dimen/padding_small"to set the margin of the layout element, andpadding="@dimen/padding_medium"to set the padding between the text and the borders.
Step 1b: Define String References/Values in "res\values\strings.xml"
Next, open "res\values\strings.xml" to ADD the actual strings, as follows:
<?xml ......?>
<resources>
    <!-- DO NOT REMOVE the existing entries -->
    ......

    <!-- ADD the following entries -->
    <string name="btnCountLabel">Count</string>
    <string name="rBtnUpLabel">Count Up</string>
    <string name="rBtnDownLabel">Count Down</string>
</resources>
Go back to "activities_main.xml". Check that the "red" errors disappear on these string references.
Step 1c: Define Dimensions in "res\values\dimens.xml"
Open "res\values\dimens.xml" to ADD the following dimension resources. Create a new one if it does not exist: Right-click on "Values" ⇒ "New" ⇒ "Value Resource File" ⇒ In "File Name", enter "dimens".
<?xml version="1.0" encoding="utf-8"?>
<resources>
    <!-- DO NOT REMOVE the existing entries -->
    <!-- ....... -->

    <!-- ADD the following entries -->
    <dimen name="padding_medium">5dp</dimen>
    <dimen name="padding_small">3dp</dimen>
</resources>
Now, go back to "activities_main.xml". There shall be no red errors.
Step 2: Program the "MainActivity.java"
Let's complete our example by writing the MainActivity.java to process the button-clicks. Modify the onCreate() method as follows:
package ......;
import ......;
// Add the following imports
import android.view.View;
import android.view.View.OnClickListener;
import android.widget.Button;
import android.widget.TextView;
import android.widget.RadioButton;

public class MainActivity extends ...... {

   // ADD references to UI views
   private TextView txtCount;
   private RadioButton rBtnUp, rBtnDown;
   private Button btnCount;
   private int count = 0;  // counter value

   // REPLACE the entire onCreate() as follows:
   @Override
   public void onCreate(Bundle savedInstanceState) {
      super.onCreate(savedInstanceState);
      setContentView(R.layout.activity_main);

      // Retrieve references to UI views via their ID in XML layout
      rBtnUp   = (RadioButton) findViewById(R.id.rBtnUpId);
      rBtnDown = (RadioButton) findViewById(R.id.rBtnDownId);
      txtCount = (TextView)    findViewById(R.id.txtCountId);
      txtCount.setText(String.valueOf(count)); // Display initial count

      btnCount = (Button) findViewById(R.id.btnCountId);
      // Process the button on-click event via an anonymous inner class
      btnCount.setOnClickListener(new OnClickListener() {
         @Override
         public void onClick(View v) {
            if (rBtnUp.isChecked()) { // Counting up
               count++;
            } else if (rBtnDown.isChecked()) { // Counting down
               count--;
            }
            txtCount.setText(String.valueOf(count));
         }
      });
   }
}
- We set the content-view of this application to "
R.layout.activity_main" which is mapped to "res\layout\activity_main.xml". - We retrieve references to the
Viewcomponents, viafindViewById()given the respective resource ID. For example, we have definedidfor theButtoninactivity_main.xmlas:<Button android:id="@+id/btnCountId" ...... />We can retrieve the reference viafindViewById(R.id.btnCountId). - For the
Button, we set the on-click handler viasetOnClickListener(). We use an inner class implementingOnClickListenerand override theonClick()handler.
Step 3: Run the Application
Now, you can run the application.
Step 4: Review the Generated "AndroidManifest.xml"
Each Android application has a manifest file (or application descriptor) named AndroidManifest.xml, in the project's root directory. It describes the application components. The manifest is generated automatically. Do NOT change this file.
<?xml ......?>
<manifest ......>

    <application
        ......
        android:label="@string/app_name"
        ......>
        <activity
            android:name=".MainActivity" >
            <intent-filter>
                <action android:name="android.intent.action.MAIN" />
                <category android:name="android.intent.category.LAUNCHER" />
            </intent-filter>
        </activity>
    </application>
</manifest>
- The
<manifest>element specifies the Java package name. It contains one<application>element. - The
<application>element specifies the icon and label used in "apps" menu. It contains one ore more<activity>elements. - This application has one activity named
MainActivityin the current package ".". The<activity>contains<intent-filter>. - The
<intent-filter>declares that this activity is the entry point (android.intent.action.MAIN) of the application and is included in the app launcher (android.intent.category.LAUNCHER).
Step 5: Using Layout XML File to Set the onClick Handler
Instead of using Button's setOnClickListener() to register a listener object, it is easier to use the Layout XML file to set the onClick handler.
ADD the line in RED to the activity_main.xml:
<Button
   android:id="@+id/btnCountId"
   android:text="@string/btnCountLabel"
   android:layout_width="wrap_content"
   android:layout_height="wrap_content"
   android:onClick="btnCountOnClickHandler" />
Go back to "MainActivity.java", you can program the event handler method btnCountOnClickHandler(), as follows:
package ......;

import ......;

public class MainActivity ...... {

   // References to UI views
   private TextView txtCount;
   private RadioButton rBtnUp, rBtnDown;
   private Button btnCount;
   private int count = 0; // counter value

   @Override
   public void onCreate(Bundle savedInstanceState) {
      super.onCreate(savedInstanceState);
      setContentView(R.layout.activity_main);

      // Retrieve references to UI views by their id in XML layout
      rBtnUp = (RadioButton) findViewById(R.id.rBtnUpId);
      rBtnDown = (RadioButton) findViewById(R.id.rBtnDownId);
      txtCount = (TextView) findViewById(R.id.txtCountId);
      txtCount.setText(String.valueOf(count)); // Display initial count
      btnCount = (Button) findViewById(R.id.btnCountId);
      // REMOVE the btnCount.setOnClickListener() method
   }

   // ADD the following Button's onClick handler (set in XML layout)
   public void btnCountOnClickHandler(View v) {
      if (rBtnUp.isChecked()) {          // Counting up
         count += 2;   // Step of 2
      } else if (rBtnDown.isChecked()) { // Counting down
         count -= 2;   // Step of 2
      }
      txtCount.setText(String.valueOf(count));
   }
}
Run the application. Observe that each button-click increment/decrement by 2.
The btnCountOnClickHandler() takes a View object as parameter, corresponding to the View (i.e., the Button or the source object) that triggers the handler.
In the earlier codes, I showed the Java "listener" code for the benefit of Java programmers, but you should use the onClick handler, as it is much easier to code.
Example 2: Relative Layout
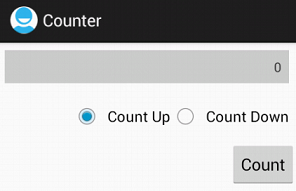
Let us modify our program to use RelativeLayout, instead of LinearLayout. In relative layout, the UI are arranged relative to each others.
Step 1: Define Layout in "res\layout\activity_main_relative.xml"
We shall use the same project (as the previous example), but specifying a new XML layout file.
Create a new XML layout file called activity_main_relative.xml in res\layout folder. Right-click on the res\layout node ⇒ New ⇒ File ⇒ "activity_main_relative.xml" ⇒ Switch to "Code" view ⇒ Enter the following codes:
<?xml version="1.0" encoding="utf-8"?>
<RelativeLayout xmlns:android="http://schemas.android.com/apk/res/android"
    xmlns:app="http://schemas.android.com/apk/res-auto"
    xmlns:tools="http://schemas.android.com/tools"
    android:layout_width="match_parent"
    android:layout_height="match_parent"
    tools:context="com.example.counter.MainActivity"
    tools:showIn="@layout/activity_main">

    <TextView
        android:id="@+id/txtCountId"
        android:layout_width="match_parent"
        android:layout_height="wrap_content"
        android:background="#cccccc"
        android:gravity="end"
        android:padding="@dimen/padding_medium"
        android:layout_margin="@dimen/padding_small" />

    <RadioGroup
        android:id="@+id/radioGroupId"
        android:layout_width="wrap_content"
        android:layout_height="wrap_content"
        android:orientation="horizontal"
        android:layout_below="@id/txtCountId"
        android:layout_alignParentRight="true"
        android:layout_alignParentEnd="true">
        <RadioButton
            android:id="@+id/rBtnUpId"
            android:text="@string/rBtnUpLabel"
            android:layout_width="wrap_content"
            android:layout_height="wrap_content"
            android:checked="true" />
        <RadioButton
            android:id="@+id/rBtnDownId"
            android:text="@string/rBtnDownLabel"
            android:layout_width="wrap_content"
            android:layout_height="wrap_content" />
    </RadioGroup>

    <Button
        android:id="@+id/btnCountId"
        android:text="@string/btnCountLabel"
        android:layout_width="wrap_content"
        android:layout_height="wrap_content"
        android:onClick="btnCountOnClickHandler"
        android:layout_below="@id/radioGroupId"
        android:layout_alignParentRight="true"
        android:layout_alignParentEnd="true" />
</RelativeLayout>
We use the RelativeLayout as the root element. In relative layout, we need to assign an id to elements that would be used for reference. As mentioned, to create an id, we use a special syntax @+id/idName, with a '+' sign to ask the Android Studio to generate an id. To reference an element, we use the syntax @id/idName.
In relative layout, we could use layout_below, layout_toLeftOf, layout_toRightOf, layout_alignParentRight, layout_alignTop, etc, to arrange a UI view relative to another view.
In this example, the RadioGroup is placed below the EditText and right-aligned with its parent RelativeLayout. The Button is placed below the RadioGroup, and also right-aligned with its parent RelativeLayout.
Step 2: Program "MainActivity.java"
Modify as follows:
    ......
    setContentView(R.layout.activity_main_relative);
    ......
Step3: Run the app
Run the app. Observe the change in layout.
More Layouts
Take a look at the various UI layouts @ http://developer.android.com/guide/topics/ui/declaring-layout.html:
LinearLayout: AViewGroupthat displays itsViewchildren in linear direction, either horizontally or vertically.RelativeLayout: AViewGroupthat display itsViewchildren in relative position to each others or to the parent. e.g., below, align (top, left, right, bottom), margin (top, left, right, bottom).ConstraintLayout: used in Graphical Layout design, which is the default for "Empty View Activity" - we shall cover in the next section.WebView: A mini-browser containing web contents.ListView: A scrollable list of items.GridView: A scrollable grid of rows and columns.- many others.
Example 3: Using the Graphical Layout Tool
Reference: "Build a UI with Layout Editor" @ https://developer.android.com/studio/write/layout-editor
Instead of coding in XML, we can also design a user interface using the "Graphical Layout Tool". We shall re-write our "counter" using graphical layout tool.
Close the previous project.
Start a new Android Studio project with "Empty View Activity", and "Name" of "CounterGraphicTool".
To design the UI using Graphical Layout Tool:
- Open (already) the "
activity_main.xml".
Select the "Design" view (at top-right corner).
There are two screens. The lighter one (design view) shows the design and constraints, while the darker one (blueprint view) shows "a simplified, outlined view of our UI which is useful when it comes to editing the spacing and proportions of complex layouts without the distraction of content".
Use the design view to make changes.
You can zoom in/out viaCtrl '+'andCtrl '-'. - REMOVE all the existing widgets: on the lighter screen ⇒ select the screen (the "hello-world" TextView) ⇒ Delete.
- Take note that the default layout is called "
ConstraintLayout" (shown in the "Component Tree" panel on the right). - Add a "
Button":- From the "Palette" ⇒ Choose "Common" (or "Buttons") ⇒ Drag and drop a "
Button" into the display. - You can resize the button by dragging the 4 corners (dark square handlers).
- The 4 hollow circles (called anchors) at the middle of the 4 sides are meant for applying constraints for positioning the widget.
- Apply the "top" constraint to anchor the button (you need to play around - very hard to describe in words):
- Select the hollow circle at the middle of the top edge and drag it to the top edge of the screen.
- Drag the "button" down to the desired location.
- The hollow circle turns solid blue to indicate constraint applied.
- Similarly, apply the "left" constraint by dragging the left anchor to the left edge.
- For each of the widget, you MUST apply at least 2 constraints to anchor the widget to its parent or another widget - a horizontal constraint and a vertical constraint.
- After the constraints are applied, you can "resize" or "re-position" the button by playing with the button. Try it out.
- From the "Palette" ⇒ Choose "Common" (or "Buttons") ⇒ Drag and drop a "
- Add a "
TextView":- From the "Palette" ⇒ Choose "Common" ("Text") ⇒ Drag and drop a "
TextView" into the display below the button. - Apply the "top" constraint to anchor it to the bottom of the button; and "left" constraint to anchor it to the left edge of the display.
- You can then re-position and re-size the "
TextView". - Select the TextView, in the "Attribute" panel on the right, look for "Common Attributes" (below the "Layout") ⇒ set "
Text" (first entry) to "0" (the initial count) ⇒ Also set the "ID" (at the top) to "textViewCount" and then "Refactor" to rename. - You can play with the rest of the "Attributes", such as the colors.
- From the "Palette" ⇒ Choose "Common" ("Text") ⇒ Drag and drop a "
- Study the XML codes generated, by selecting the "Code" view.
- Creating a string resource by opening the "
Strings.xml", and add this entry:<string name="count_label">Count</string>
- Go back to "
activity_main.xml", choose the "Design" view. Select theButton. In the "Attributes" panel, under "Common Attributes" ⇒ "Text", type "@" or push the "pick a reference" (the small oval icon at the end), and select "@string/count_label" which we have just created. Notice that the label of the button changes to "Count Up". - Select the
Button⇒ Under "Common Attributes" ⇒ "onClick", enter"btnCountOnClickHandler"(similar to the previous example). - Modify the
MainActivity.javato include thebtnCountOnClickHandler()method:...... import android.view.View; import android.widget.TextView; public class MainActivity extends ...... {
private TextView txtCount; private int count = 0; @Override protected void onCreate(Bundle savedInstanceState) { super.onCreate(savedInstanceState); ...... setContentView(R.layout.activity_main); // maps to "res/layout/activity_main.xml" txtCount = (TextView) findViewById(R.id.textViewCount); // Verify the ID of the TextView from Attributes! // Don't change any thing below, IF ANY ...... } // Add this event handler method after the onCreate() public void btnCountOnClickHandler(View v) { count++; txtCount.setText(String.valueOf(count)); } // Do NOT touch the existing codes, if any ...... } - Run the app.
- (Optional and Difficult) Add 2 radio buttons for count up/down, by first drag and drop a "Radio Group" from "Container", then two "Radio Button" from "Widgets" inside the "Radio Group". Modify the
MainActivity.javato include the radio buttons (study the codes in the previous example!!!)
Why using the Graphical Layout Tool? Coding in XML is difficult in laying out the widgets! You didn't feel it because you copied the XML codes from me instead of writing yourself!
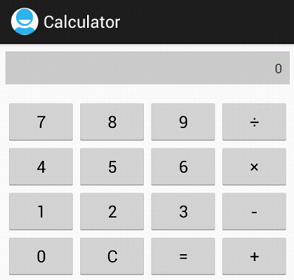
Example 4: Simple Calculator
Start an Android Studio project with "Empty View Activity" and name of Calculator.
Step 1: Define Layout in "res\layout\activity_main.xml"
The UI consists of a TextView for displaying the result and 16 Buttons. We use TableLayout to layout the buttons in rows and columns as illustrated.
<?xml version="1.0" encoding="utf-8"?>
<RelativeLayout xmlns:android="http://schemas.android.com/apk/res/android"
    xmlns:app="http://schemas.android.com/apk/res-auto"
    xmlns:tools="http://schemas.android.com/tools"
    android:layout_width="match_parent"
    android:layout_height="match_parent"
    tools:context="com.example.calculator.MainActivity"
    tools:showIn="@layout/activity_main">

    <TextView
        android:id="@+id/txtResultId"
        android:layout_width="fill_parent"
        android:layout_height="wrap_content"
        android:background="#cccccc"
        android:gravity="end" />

    <TableLayout
        android:id="@+id/tableId"
        android:layout_width="match_parent"
        android:layout_height="wrap_content"
        android:layout_below="@id/txtResultId" >
        <TableRow>
            <Button
                android:id="@+id/btnNum7Id"
                android:onClick="btnNumOnClickHandler"
                android:text="7"
                android:layout_width="fill_parent"
                android:layout_height="wrap_content"
                android:layout_weight="1" />
            <Button
                android:id="@+id/btnNum8Id"
                android:onClick="btnNumOnClickHandler"
                android:text="8"
                android:layout_width="fill_parent"
                android:layout_height="wrap_content"
                android:layout_weight="1" />
            <Button
                android:id="@+id/btnNum9Id"
                android:onClick="btnNumOnClickHandler"
                android:text="9"
                android:layout_width="fill_parent"
                android:layout_height="wrap_content"
                android:layout_weight="1" />
            <Button
                android:id="@+id/btnDivId"
                android:onClick="btnOperOnClickHandler"
                android:text="/"
                android:layout_width="fill_parent"
                android:layout_height="wrap_content"
                android:layout_weight="1" />
        </TableRow>
        <TableRow>
            <Button
                android:id="@+id/btnNum4Id"
                android:onClick="btnNumOnClickHandler"
                android:text="4"
                android:layout_width="fill_parent"
                android:layout_height="wrap_content"
                android:layout_weight="1" />
            <Button
                android:id="@+id/btnNum5Id"
                android:onClick="btnNumOnClickHandler"
                android:text="5"
                android:layout_width="fill_parent"
                android:layout_height="wrap_content"
                android:layout_weight="1" />
            <Button
                android:id="@+id/btnNum6Id"
                android:onClick="btnNumOnClickHandler"
                android:text="6"
                android:layout_width="fill_parent"
                android:layout_height="wrap_content"
                android:layout_weight="1" />
            <Button
                android:id="@+id/btnMulId"
                android:onClick="btnOperOnClickHandler"
                android:text="*"
                android:layout_width="fill_parent"
                android:layout_height="wrap_content"
                android:layout_weight="1" />
        </TableRow>
        <TableRow>
            <Button
                android:id="@+id/btnNum1Id"
                android:onClick="btnNumOnClickHandler"
                android:text="1"
                android:layout_width="fill_parent"
                android:layout_height="wrap_content"
                android:layout_weight="1" />
            <Button
                android:id="@+id/btnNum2Id"
                android:onClick="btnNumOnClickHandler"
                android:text="2"
                android:layout_width="fill_parent"
                android:layout_height="wrap_content"
                android:layout_weight="1" />
            <Button
                android:id="@+id/btnNum3Id"
                android:onClick="btnNumOnClickHandler"
                android:text="3"
                android:layout_width="fill_parent"
                android:layout_height="wrap_content"
                android:layout_weight="1" />
            <Button
                android:id="@+id/btnSubId"
                android:onClick="btnOperOnClickHandler"
                android:text="-"
                android:layout_width="fill_parent"
                android:layout_height="wrap_content"
                android:layout_weight="1" />
        </TableRow>
        <TableRow>
            <Button
                android:id="@+id/btnNum0Id"
                android:onClick="btnNumOnClickHandler"
                android:text="0"
                android:layout_width="fill_parent"
                android:layout_height="wrap_content"
                android:layout_weight="1" />
            <Button
                android:id="@+id/btnClearId"
                android:onClick="btnClearOnClickHandler"
                android:text="C"
                android:layout_width="fill_parent"
                android:layout_height="wrap_content"
                android:layout_weight="1" />
            <Button
                android:id="@+id/btnEqualId"
                android:onClick="btnOperOnClickHandler"
                android:text="="
                android:layout_width="fill_parent"
                android:layout_height="wrap_content"
                android:layout_weight="1" />
            <Button
                android:id="@+id/btnAddId"
                android:onClick="btnOperOnClickHandler"
                android:text="+"
                android:layout_width="fill_parent"
                android:layout_height="wrap_content"
                android:layout_weight="1" />
        </TableRow>
    </TableLayout>
</RelativeLayout>
Step 2: Program "MainActivity.java"
package ......;
import ......;
import android.util.Log;
import android.view.View;
import android.view.View.OnClickListener;
import android.widget.TextView;
import android.widget.Button;

public class MainActivity extends ...... {

   private TextView txtResult; // Reference to EditText of result
   private int result = 0;     // Result of computation
   private String inStr = "0"; // Current input string
   // Previous operator: '+', '-', '*', '/', '=' or ' ' (no operator)
   private char lastOperator = ' ';

   // REPLACE the entire onCreate() method as follows:
   @Override
   public void onCreate(Bundle savedInstanceState) {
      super.onCreate(savedInstanceState);
      setContentView(R.layout.activity_main);

      // Retrieve a reference to the EditText field for displaying the result.
      txtResult = (TextView) findViewById(R.id.txtResultId);
      txtResult.setText("0");
   }

   // On-click handler for number buttons
   public void btnNumOnClickHandler(View view) {
      String inDigit = ((Button) view).getText().toString();
      if (inStr.equals("0")) {
         inStr = inDigit;  // no leading zero
      } else {
         inStr += inDigit; // accumulate input digit
      }
      txtResult.setText(inStr);
   }

   // On-click handler for operator (+, -, *, /, =) buttons
   public void btnOperOnClickHandler(View view) {
      char currentOperator = ((Button) view).getText().toString().charAt(0);
      int inNum = Integer.parseInt(inStr);
      if (lastOperator == '+') {
         result += inNum;
      } else if (lastOperator == '-') {
         result -= inNum;
      } else if (lastOperator == '*') {
         result *= inNum;
      } else if (lastOperator == '/') {
         result /= inNum;
      } else if (lastOperator == '=') {
         // keep result
      } else if (lastOperator == ' ') {
         result = inNum;   // no operation
      } else {
         Log.e("compute", "impossible operator: " + lastOperator);
      }
      txtResult.setText(String.valueOf(result));
      lastOperator = currentOperator;
      inStr = "0";  // clear
   }

   // On-click handler for clear button
   public void btnClearOnClickHandler(View view) {
      result = 0;
      inStr = "0";
      lastOperator = ' ';
      txtResult.setText("0");
   }
}
We define 3 on-click handler methods: btnNumOnClickHandler(), btnOperOnClickHandler() and btnClearOnClickHandler() for handling number, operator and clear buttons respectively. We set the handler for each button via android:onClick property in the XML layout.
Step 3: Run the app
Starting Another Activity
Example 5: Using an Intent to Start a Second Activity
In this example, we shall illustrate how to write an app with two activities (two screens), and use an Intent to start the second activity from the first one. As mentioned, an Intent, as its name implies, is an intention to do something - in most cases, start another activity. Intents are like "glue" that enables different activities from different application to work together.
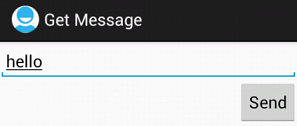
The first activity prompts user to enter a message (into an EditText) and launch the second activity to display the message, when "Send" Button is pressed.
Step 1a: Create a new Project with the First Activity "GetMessageActivity"
- Start a new Android project with "Empty View Activity", and name of "
Test Intent". - Right-click on the "
activity_main.xml" (underapp,res,layout) ⇒ Refactor ⇒ Rename ⇒ "activity_get_message" (without.xml) ⇒ Refactor. - Right-click on the "
MainActivity" (underapp,java,com.example.testintent) ⇒ Refactor ⇒ Rename ⇒ "GetMessageActivity" ⇒ Refactor.
Step 1b: Define the Layout of the First Activity in "res\layout\activity_get_message.xml"
A "RelativeLayout" is used with two views: an EditText (a text field for user to enter text) and a Button. The EditText has a "hint" string, which will be shown when the field is empty. Button has an "onClick" handler called sendMessage, to be written in the activity.
<?xml version="1.0" encoding="utf-8"?>
<RelativeLayout xmlns:android="http://schemas.android.com/apk/res/android"
    xmlns:app="http://schemas.android.com/apk/res-auto"
    xmlns:tools="http://schemas.android.com/tools"
    android:layout_width="match_parent"
    android:layout_height="match_parent"
    tools:context="com.example.testintent.GetMessageActivity"
    tools:showIn="@layout/activity_get_message">

    <EditText
        android:id="@+id/txtMessageID"
        android:hint="@string/message"
        android:layout_width="match_parent"
        android:layout_height="wrap_content" />

    <Button
        android:id="@+id/btnSend"
        android:onClick="sendMessage"
        android:text="@string/btnSendLabel"
        android:layout_width="wrap_content"
        android:layout_height="wrap_content"
        android:layout_below="@id/txtMessageID"
        android:layout_alignParentRight="true" />
</RelativeLayout>
Step 1c: Define String References/Values in "res\values\string.xml"
Include the following string references, which was used in the above layout:
<string name="btnSendLabel">Send</string>
<string name="message">Enter your text here</string>
Step 1d: Program the First Activity "GetMessageActivity.java"
package ......;
import ......;
import android.content.Intent;
import android.view.View;
import android.widget.EditText;

public class GetMessageActivity extends ...... {
   public final static String EXTRA_MESSAGE = "com.example.testintent.MESSAGE";

   // Replace onCreate()
   @Override
   public void onCreate(Bundle savedInstanceState) {
      super.onCreate(savedInstanceState);
      setContentView(R.layout.activity_get_message);  // res/layout/activity_get_message.xml
   }

   // On-click handler for "Send" button
   public void sendMessage(View view) {
      // Create an Intent to start the second activity
      Intent intent = new Intent(this, DisplayMessageActivity.class);
      // Retrieve the message entered and put into the Intent
      EditText txtMessage = (EditText) findViewById(R.id.txtMessageID);
      String message = txtMessage.getText().toString();
      intent.putExtra(EXTRA_MESSAGE, message);  // key-value pair
      // Start the intended activity
      startActivity(intent);
   }
}
This activity includes the "Send" Button's onClick handler sendMessage(). It creates an Intent object for launching the second activity called "DisplayMessageActivity". It then retrieves the message entered into the EditText, puts the message into the Intent object, with a key "EXTRA_MESSAGE", and starts the intended activity.
Step 2a: Create the the Second Activity "DisplayMessageActivity"
We need to call our second activity "DisplayMessageActivity", as declared in the Intent. We shall use a new layout called "activity_display_message".
Right-click on "Java" node ⇒ New ⇒ Activity ⇒ Empty View Activity ⇒ In "Activity Name", enter "DisplayMessageActivity" ⇒ In "Layout Name", enter "activity_display_message" (default) ⇒ In "Package name", enter "com.example.testintent" (default) ⇒ Finish.
Step 2b: Define the Layout of the Second Activity in "res\layout\activity_display_message"
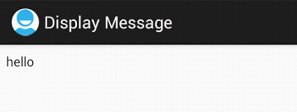
This layout contain one view - a TextView to display the message received from the first activity.
<?xml version="1.0" encoding="utf-8"?>
<RelativeLayout xmlns:android="http://schemas.android.com/apk/res/android"
    xmlns:app="http://schemas.android.com/apk/res-auto"
    xmlns:tools="http://schemas.android.com/tools"
    android:layout_width="match_parent"
    android:layout_height="match_parent"
    tools:context="com.example.testintent.DisplayMessageActivity"
    tools:showIn="@layout/activity_display_message">

    <TextView
        android:id="@+id/txtDisplayID"
        android:layout_width="match_parent"
        android:layout_height="wrap_content" />
</RelativeLayout>
Step 2c: Program the Second Activity "DisplayMessageActivity.java"
Modify the onCreate() as follows:.
package ......;

import ......;
import android.content.Intent;
import android.widget.TextView;

public class DisplayMessageActivity extends ...... {

    // REPLACE onCreated()
    @Override
    public void onCreate(Bundle savedInstanceState) {
        super.onCreate(savedInstanceState);
        setContentView(R.layout.activity_display_message);  // res/layout/activity_display_message.xml

        // Get the message from the intent
        Intent intent = getIntent();
        String message = intent.getStringExtra(GetMessageActivity.EXTRA_MESSAGE);

        // Get the display TextView for this activity and display the message
        TextView txtDisplay = (TextView) findViewById(R.id.txtDisplayID);
        txtDisplay.setText(message);
    }
}
This activity gets the Intent object that started it via getIntent(), and retrieves the message put into the Intent via its key. It then puts the message on the TextView.
Take note that the content-view is set to "R.layout.activity_display_message" which corresponds to the "res\layout\activity_display_message.xml" we have created earlier.
Step 3: Review the Generated "AndroidManifest.xml"
Check out the manifest. A new activity has been declared (automatically by Android Studio) as follows:
......
<application .......>
   <activity android:name=".DisplayMessageActivity"></activity>
   <activity android:name=".GetMessageActivity">
      <intent-filter>
         <action android:name="android.intent.action.MAIN" />
         <category android:name="android.intent.category.LAUNCHER" />
      </intent-filter>
   </activity>
</application>
The name of the activity is "DisplayMessageActivity" (in current package). There is no need for the <intent-filter> as this activity is launched from the first activity.
Step 4: Run the App
Now, you can run the app.
Example 6: Returning Result from Second Activity
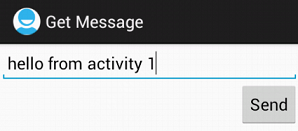
In this example, we shall illustrate how the second activity can return a result back to the first activity.
Step 1a: Modify the Program of the First Activity "GetMessageActivity.java"
Modify the first activity "GetMessageActivity.java" to use startActivityForResult() to start the second activity and receive the result (instead of startActivity()). Also include an onActivityResult() handler to handle the returned result.
package ......;

import ......;
import android.widget.Toast;

public class GetMessageActivity extnds ...... {
   public final static String EXTRA_MESSAGE = "com.example.testintent.MESSAGE";
   private int requestCode = 1;

   @Override
   public void onCreate(Bundle savedInstanceState) {
      super.onCreate(savedInstanceState);
      setContentView(R.layout.activity_get_message);
   }

   // On-click handler for the "Send" button
   public void sendMessage(View view) {
      // Retrieve the message entered
      EditText txtMessage = (EditText) findViewById(R.id.txtMessageID);
      String message = txtMessage.getText().toString();

      // Create an Intent to start the second activity
      Intent intent = new Intent(this, DisplayMessageActivity.class);
      intent.putExtra(EXTRA_MESSAGE, message);
      //startActivity(intent);                      // comment out this line
      startActivityForResult(intent, requestCode);  // add this line, deprecated but still runs
   }

   /** CallBack when the second activity returns a result */
   @Override
   public void onActivityResult(int resultRequestCode, int resultCode, Intent result) {
      super.onActivityResult(resultRequestCode, resultCode, result);
      if (resultRequestCode == requestCode) {
         if (resultCode == RESULT_OK) {
            Toast.makeText(this, result.getData().toString(), Toast.LENGTH_LONG).show();
         }
      }
   }
}
On the onActivityResult() handler, we use the Intent's getData() to retrieve the return string, and display on a Toast (a floating view of text message) for Toast.LENGTH_LONG of times.
Notes (2023): the method startActivityForResult(Intent, int) is deprecated, but still runs. I keep the deprecated code because the new code is really hard to understand.
[SKIP] For completeness, the new codes are:
package ......;

import ......;
import android.widget.Toast;

public class GetMessageActivity ...... {
   public final static String EXTRA_MESSAGE = "com.example.testintent.MESSAGE";

   @Override
   public void onCreate(Bundle savedInstanceState) {
      super.onCreate(savedInstanceState);
      setContentView(R.layout.activity_get_message);
   }

   /** Callback when the user clicks the "Send" button */
   public void sendMessage(View view) {
      // Retrieve the message entered
      EditText txtMessage = (EditText) findViewById(R.id.txtMessageID);
      String message = txtMessage.getText().toString();

      // Create an Intent to start the second activity
      Intent intent = new Intent(this, DisplayMessageActivity.class);
      intent.putExtra(EXTRA_MESSAGE, message);
      //startActivity(intent);                      // comment out this line
      displayMessageActivityResultLauncher.launch(intent);  // add this line
   }

   /** CallBack when the second activity returns a result */
   ActivityResultLauncher<Intent> displayMessageActivityResultLauncher = registerForActivityResult(
            new ActivityResultContracts.StartActivityForResult(),
            new ActivityResultCallback<ActivityResult>() {
        @Override
        public void onActivityResult(ActivityResult result) {
           if (result.getResultCode() == RESULT_OK) {
              if (result.getData() != null) {
                 Toast.makeText(GetMessageActivity.this, result.getData().getData().toString(),
                    Toast.LENGTH_LONG).show();
              }
           }
        }
    });
}
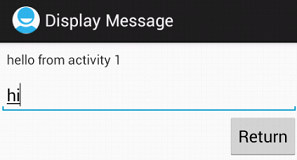
Step 2: Modify the Layout of the Second Activity in "res\layout\activity_display_message.xml"
Add an EditView and a Button in the layout as follows:
<RelativeLayout ...... >

    <TextView ...... />

    <EditText
        android:id="@+id/txtReturnedID"
        android:hint="@string/message"
        android:layout_width="match_parent"
        android:layout_height="wrap_content"
        android:layout_below="@id/txtDisplayID" />

    <Button
        android:id="@+id/btnReturn"
        android:onClick="returnMessage"
        android:text="@string/btnReturnLabel"
        android:layout_width="wrap_content"
        android:layout_height="wrap_content"
        android:layout_below="@id/txtReturnedID"
        android:layout_alignParentRight="true" />
</RelativeLayout>
We specify the onClick handler for the Button as returnMessage().
Include this string reference in res\values\string.xml:
<string name="btnReturnLabel">Return</string>
Step 3: Modify the Program of the Second Activity "DisplayMessageActivity.java"
Modify the second activity to return a message to the first activity that started it.
package ......;

import ......;
import android.net.Uri;
import android.view.View;
import android.widget.EditText;

public class DisplayMessageActivity extends ...... {

   @Override
   public void onCreate(Bundle savedInstanceState) {
      super.onCreate(savedInstanceState);
      setContentView(R.layout.activity_display_message);

      // Get the message entered in the first activity from the intent
      Intent intent = getIntent();
      String message = intent.getStringExtra(GetMessageActivity.EXTRA_MESSAGE);

      // Get the display TextView for this activity and display the message
      TextView txtDisplay = (TextView) findViewById(R.id.txtDisplayID);
      txtDisplay.setText(message);
   }

   // onClick handler for Button "Return"
   public void returnMessage(View view) {
      Intent result = new Intent();
      // Retrieve the string entered in the EditView
      EditText txtReturn = (EditText) findViewById(R.id.txtReturnedID);
      String returnMessage = txtReturn.getText().toString();
      // Set the message back
      result.setData(Uri.parse(returnMessage));
      setResult(RESULT_OK, result);
      // Close the activity
      finish();
   }
}
Upon clicking of "Return" button, the handler retrieves the Intent object, set the return data (via setData()). It then sets the result code (via setResult()) and closes this activity (via finish()).
Step 4: Run the App
Now, re-run the app. Observe the toast message at the bottom of the screen (which disappears after a few second). You need to hide the keyboard.
Link to Android's References and Resources